What I like about street photography is how undemanding it is.
What you really need is an idea and a camera that doesn’t get in your way.
For example, say you’re walking down the street. And then, something catches your eye.
Now, you want to share what you saw with someone else.
If there’s someone with you, you’d just point to the scene. But that reaches one person. What if you could reach thousands? That’d be amazing.
Also, the scene changes in the next fraction of a second. So when the other person turns, that moment is probably already gone.
So we have two problems to solve: capturing the moment before it passes, and preserving it so we can share it with a bigger audience.
You need a tool to catch that moment, preserve it, and show it to the world.
This is what a camera does.
But now, between you and the scene, there’s a third element—the camera itself.
It gets in the way.
The street photographer’s duty is to minimize this interference, to reduce the friction between what you want to capture and what the camera actually captures.
The more successful you are at doing this, the better you get at capturing what you want, and the better your chances of becoming a good photographer.
Because you’ll have more time to think about what to photograph instead of how to capture it.
This is what this blog post is about: removing the camera from your way.
Table of Contents
The right camera settings make you free
So how do we reduce this friction? How do we remove the camera from the way?
By mastering its settings.
If you can set up your camera so you don’t have to think about focus, exposure, or ISO—if those decisions become automatic—you can focus solely on your subject. The camera and you become a single organism. However you want to take the picture, no matter what conditions you encounter on the street, you know the camera will take care of it.
In other words, the goal is to make your Sony A6000 series camera into a customizable and versatile point-and-shoot.
Here’s how to do it.
Part 1: The basics
This section is intended to give you a brief introduction to the terms and basics of photography I’ll be using in the upcoming sections. It also covers how to set up custom keys on the Sony A6000 series.
Feel free to skip this section if you’re already familiar with these concepts and camera configurations.
18% grey
Any modern camera, including your phone, has a baseline for what a good image should look like—how dark or bright the image should be.
That baseline is 18% grey. The camera adjusts its aperture diameter (aperture), how long the aperture stays open (shutter speed), and the sensitivity of the sensor (ISO) so that the final output—the photo you take—reflects 18% of the light that hits it.
This 18% reflection is chosen because the human mind unconsciously sees 18% grey as the “correct exposure.”
In other words, when we see a picture taken at 18% grey, it feels right to us.

The exposure triangle
The basic difference between a phone camera and a commercial camera is this: the phone does it for you, whereas a commercial camera gives you the freedom to do it yourself.
If you don’t set up anything—like on your phone—the camera automatically adjusts the aperture, shutter speed, and ISO so that the photo reflects 18% grey.
But phone cameras have their limitations.
For instance, if you’re at a bike race and want to capture a bike passing by, more often than not, the photo you take with your phone will be blurry.
But a commercial camera is more flexible.
It gives you room to be creative by letting you manually control the aperture, shutter speed, and ISO, so you can get the image without any blur.
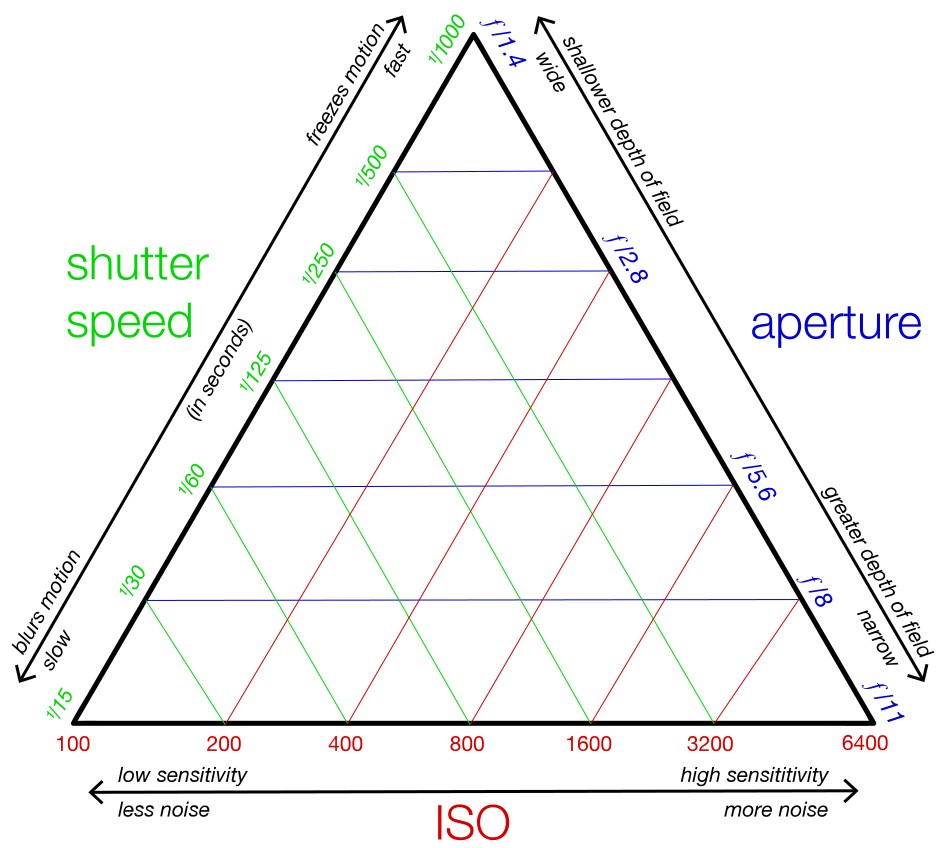
If you want to freeze the bike rider, you can do it by choosing a higher shutter speed—the camera aperture stays open for only a very short period of time. These higher shutter speeds aren’t possible with a mobile camera.
But now, because the aperture is only open for a brief moment, the amount of light coming through the lens is very small.
So to compensate and bring the exposure back to 18% grey, you have to let in more light in another way.
There are two options: either open the hole in your lens wider (the aperture) or increase the sensitivity of the sensor (ISO).
But these are, of course, compromises.
When you increase the diameter of the aperture, the depth of field gets narrower—you can’t keep things far from your subject in focus.
When you increase ISO, the graininess of the image increases.
Still, this lets us do what we wanted in the first place: freeze the motion without a blurry image.
If you’re looking for a comprehensive guide on these concepts, check out Cody Michele’s video here.
Summary
| Setting | Function | More Light | Less Light |
|---|---|---|---|
| Aperture (f-stop) | Controls the size of the lens opening; lower f-number = bigger opening | Use a smaller f-number (e.g., f/2 → f/1.8) | Use a larger f-number (e.g., f/5.6 → f/8) |
| Shutter Speed | Controls how long the sensor is exposed to light | Slow down shutter (e.g., 1/125 → 1/60 sec) | Speed up shutter (e.g., 1/60 → 1/250 sec) |
| ISO | Controls the sensor’s sensitivity to light | Increase ISO (e.g., 400 → 800) | Decrease ISO (e.g., 800 → 400) |
How to set custom buttons in the 6000 series?
What makes you really efficient is the right selection of settings—and how fast you can adjust them on the street.
To do this, you should know your equipment inside and out—what it can do and what all its limits are.
It doesn’t really matter if it has many limits—what matters is knowing all of them.
The best practice is to set custom buttons for your most important settings.
If you have a Sony A6000 series camera, there’s plenty of room to do exactly that.
Here’s how to do it.
1. Open the Menu
Press the MENU button →
You’ll see the familiar pages of icons.
2. Go to the Custom Settings tab
MENU → Camera icon(2) →
Scroll right until you see “Custom Operation” or “Operation Customize.”
(Some models place this under the gear icon, depending on year.)
3. Select “Custom Key Settings”
Camera icon → Custom Operation → Custom Key
This is where all assignable buttons live.
4. Pick the button you want to change
On Sony A6000-series bodies, the customizable buttons typically include:
- C1 (top right)
- C2 (near the shutter button)
- AEL button
- AF/MF button
- Control Wheel (left, right, down, center)
- Movie button (on some models)
Menu → Custom Key → Select the button name →
5. Choose the function you want
After selecting a button, you’ll see a long list of functions →
Scroll → pick the one you want → press OK.
A few popular choices include:
- AF/MF Toggle
- Focus Magnifier
- ISO
- White Balance
- Eye AF
- APS-C/Super35 Crop toggle (model dependent)
- Drive Mode
Part 2: The Base Settings
For 95% of street photography, there’s a certain set of settings you can configure on your camera and then forget about.
Below is that foundation—the settings you need to remove the camera from your way.
The reasoning behind each setting and custom button is described below.
- Mode: Aperture Priority (A)
- Aperture: f/8
- Shutter Speed: Minimum 1/125s
- ISO: Auto ISO, max 3200(in daytime, 6400 at night)
- Focus Mode: Manual focus(For zone focusing)
Mode: Aperture Priory
Aperture Priority (A mode) is the most practical way to shoot street on the Sony A6400 because it gives you creative control while keeping you fast.
Setting your camera to Aperture Priority means you only have to open your aperture (if you need more light) or close it (to block more light)—and not think about anything else.
You set the aperture, and the camera handles shutter speed instantly as light changes.
This frees you to focus on timing, composition, and movement instead of constantly adjusting exposure.
How to set aperture priority: Rotate the mode dial to A
Aperture
The photographer Weegee had a mantra: “F/8 and be there.”
I find this to be true and extremely effective in street photography.
There are two main reasons for this. One is that most lenses give their sharpest image around f/8. And two, it gives you a wider depth of field to work with.
But mind you, this depends on your lens of choice.
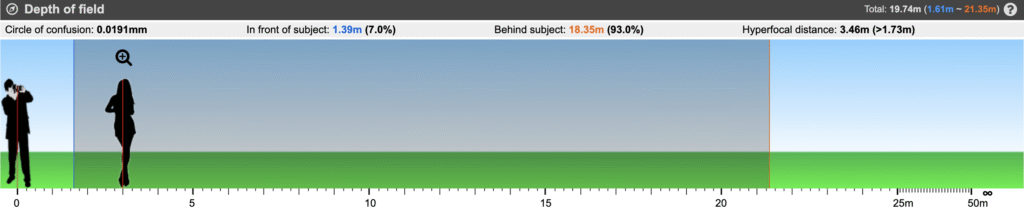
You can easily calculate your depth of field using the free online tool: DOF Simulator.
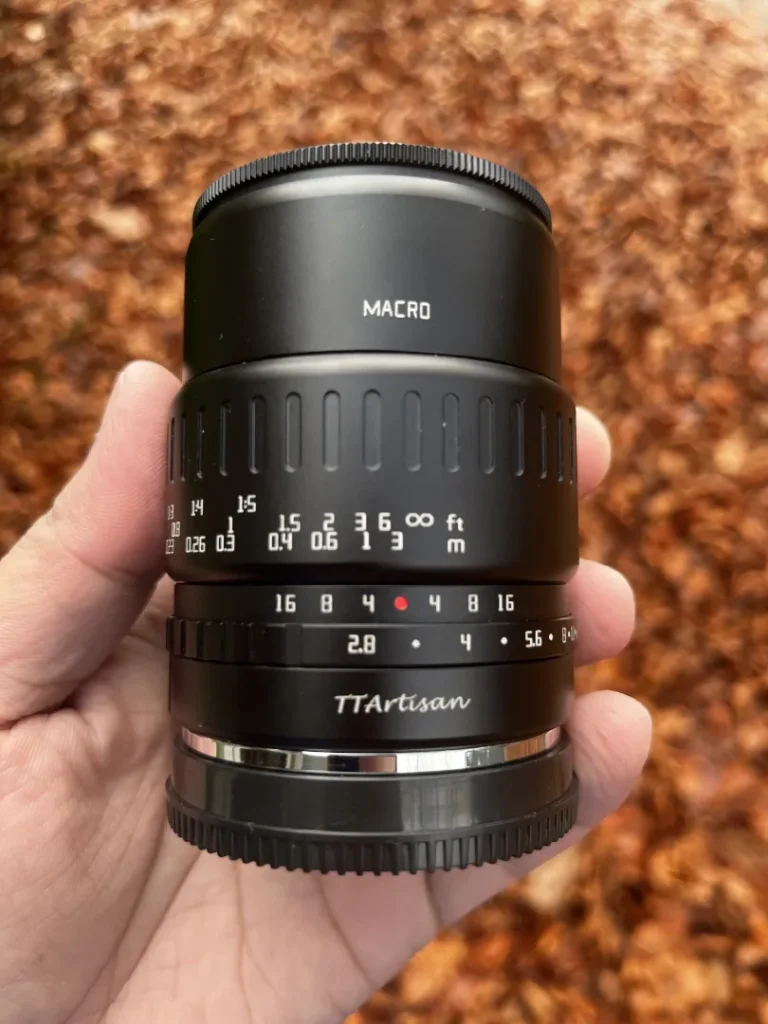
For instance, my lens of choice has a 24mm focal length. With the aperture at f/8, if my focusing distance is at 3 meters, anything from 1.39 meters to 18.35 meters will be in focus.
How to set aperture: Rotate the control wheel to the intended aperture.
Shutter speed
Now that the aperture is set to f/8, all the basics are primarily set—both the shutter speed and ISO are automatic, so the camera will take care of them. But there’s one important thing you need to consider. What if the light gets darker and, to compensate, the camera decreases the shutter speed to maintain 18% grey? This becomes a problem when it drops below a certain threshold. The rule of thumb is this: if your camera lens is, say, 50mm, the minimum shutter speed should be double that—1/100 seconds. If the shutter speed gets lower, camera shake can take effect, leading to blurry photos.
Luckily, the A6000 series has a solution for this. You can set a minimum shutter speed.
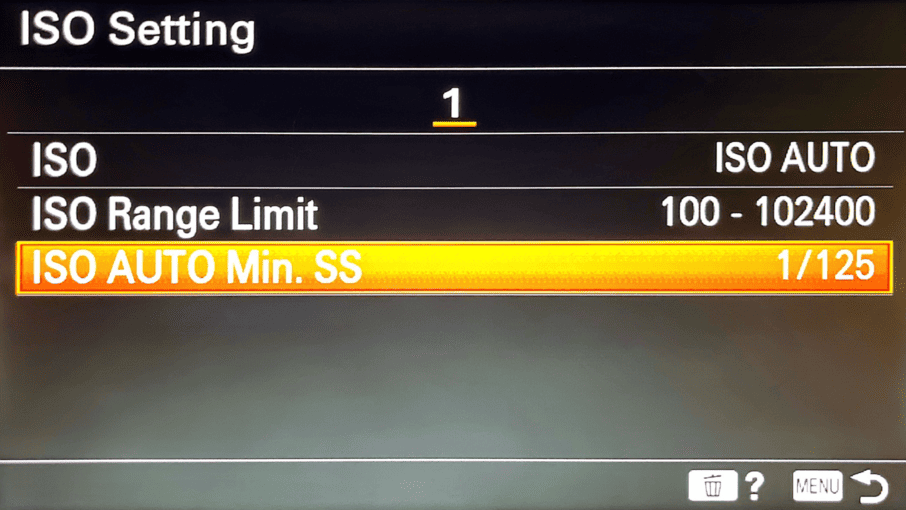
- Menu
- Go to the Camera 1 tab (the camera icon).
- Find Exposure1 / Exposure2 depending on your model.
- Select ISO AUTO Min. SS or ISO Auto → Min. Shutter Speed.
- Choose: 1/125s
- Use Fast or set it manually to 1/250 for fast moving scenes.
As I mentioned above, there should be a compromise for this, and that comes from ISO. Now that the aperture is set and a lower boundary for the shutter speed is also established, if there’s low light, the camera compensates—to keep the picture at 18% grey, the ISO goes up.
This means you end up with more grains.
Now, for a normal sunny day, considering the other two settings (f/8 and 1/120), the ISO won’t go up that much—at least not enough to make the picture really grainy.
ISO: Auto ISO, max 3200(in daytime, 6400 at night)
A good rule of thumb is to set an upper limit to ISO. In daylight, this upper boundary can be 3200, and at night, 6400.
What happens if the light is low and ISO reaches 3200? The A6000 series is designed so that when this happens, it breaches the Auto Min. SS—that is, it now goes below 1/120 to compensate for 18% grey. But this rarely happens. Even when it does, the pictures don’t get blurry until the shutter speed reaches numbers like 1/30 or below.
So this works 99% of the time.
How to set up ISO range limit: MENU → Camera Settings → ISO setting → Auto ISO → ISO Range limit → set your minimum and maximum ISO limits.
Focus Mode: Manual focus
This is the final step in this set and the most important one.
As I mentioned above, setting the aperture at f/8 gives you a broad depth of field to work with. This is crucial for street photography because the working distance for a street photographer is very similar to this depth of field, assuming your lens of choice is 35mm or below. What I mean is this: with a 35mm or 28mm lens, you’re operating at most 1–3 meters away from your subject. That’s the lower limit. The upper limit is often set by the buildings and other structures around the street.
My point is: you don’t need autofocus for street photography at all. With these settings, everything you want in focus is in focus.
But why not use autofocus? Most people buy Sony cameras precisely because the autofocus is so good. This is, in fact, true. For instance, the Sony A6400 has an impressive 0.02-second autofocus. Of course, this is more than enough to get the focus right in time, and if you choose zone focusing, it will work. However, from what I’ve seen, manual zone focusing has a much higher success rate.
Here’s why. Sometimes you get focused on something you didn’t intend to, and you might miss the shot. Also, no matter that autofocus is set at 0.02 seconds, you still need at least half a second to half-press the shutter button—you have to do this to focus on your subject. So altogether, you’re looking at half a second. On the streets, half a second is a lot of time—enough time to miss most shots.
Here’s how to do it. Decide on your working range. For example, I like to set my camera’s focusing distance to 3 meters. As I mentioned above, this gives me a working range of 1.39 meters to 18.35 meters—anything within this range will be in focus. By doing this, you become incredibly fast on the street. You don’t have to press the shutter button halfway to set autofocus. You just point and shoot.
This is what’s defined as zone focusing in photography.
How to set up the focusing distance.
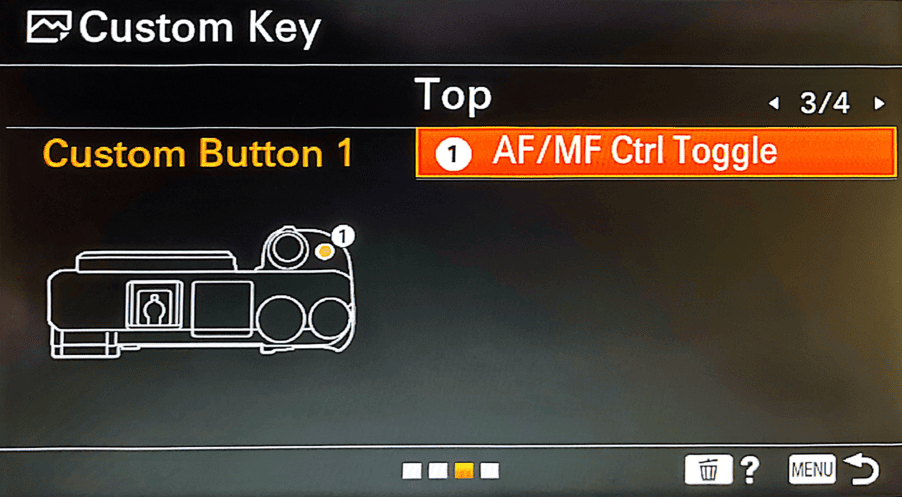
If you have a manual focus lens, you can do this accurately by looking at the markings around the barrel. Set the marker (here it’s shown in red) to whichever distance you want to focus on.
If you have an autofocus lens and there are no markings around the barrel, toggle the focus mode to manual. I set the custom button C1 to do this because I do it all the time. Then rotate the focus ring counterclockwise. Your Sony A6000 camera will show the focusing distance on the screen.
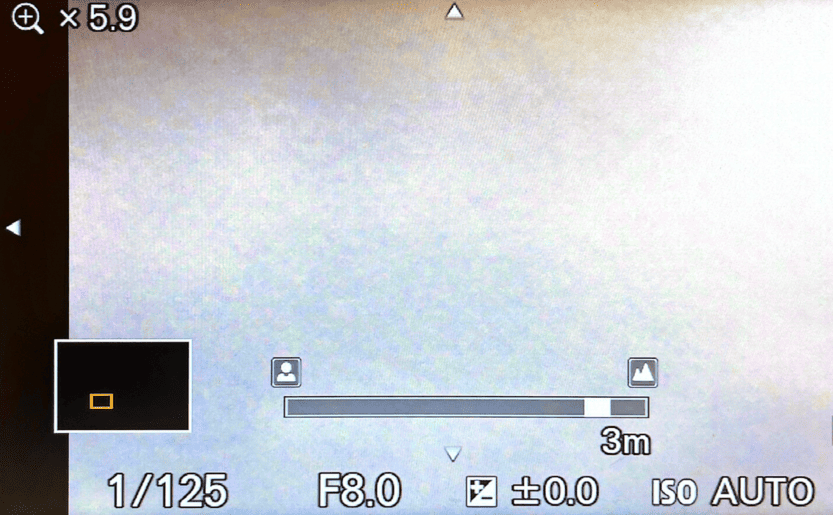
How to toggle manual focus: Switch the lens to MF (Manual Focus) and/or MENU → Camera Settings → AF/MF → Focus Mode → MF.
Part 3: The integrations
Drive Mode: Continuous Lo
Sony has an impressive drive mode speed. For example, the Sony A6400 can shoot up to 11 frames per second (Continuous Hi+ mode). That’s really impressive.
But the more I shoot on the street, the more I’ve realized Continuous Hi+ isn’t the best use case for it. Continuous Lo, which shoots 3 frames per second instead, is the sweet spot. Because high-speed bursts—even with a high-end machine like this—can get messy on the street.
Here are some of the problems I’ve noticed.
- It fills your buffer. It kills your culling time.
- It causes you to overshoot and miss timing.
- It makes the camera louder and more noticeable.
- It can pull you away from actually seeing the street—the most important point.
- And you’ll have so many duplicates to sort through in post.
Continuous Lo, on the other hand, supports your work. It acts as a safety net without taking control from you. As a result, you stay present, and your timing gets better and better over time—not sloppier.
White Balance: Auto
Setting up the white balance to match the scene feels luxurious, and modern cameras allow us to do this. But on the streets, the lighting is always changing—warm cafe glows, cool shadows, neon signs, mixed lights, streetlamps. The streets have them all.
So if you lock into a fixed white balance, chances are at least some of your photos will have weird tints. You have enough leverage with a good machine like the Sony A6000 to set the white balance to auto and get decent results all the time. So setting it to auto isn’t a waste of your money—it’s actually the opposite.
Also, this becomes one more thing you can forget about and focus more on your subjects.
Image Quality: RAW + JPEG or JPEG Fine
With A mode + Auto ISO + a Minimum Shutter Speed, the A6400 becomes almost automatic in the best way. You control the aesthetic; the camera protects you from motion blur and bad exposure.
Now it’s ready for the streets.
Now, the final step is to think about the outcome. If you have access to a raw file editor—like Affinity Photo 2 or Adobe Lightroom—it’s always best to shoot RAW, even if you want the JPEG. Or if you don’t want to edit photos, or if you choose to edit them on your phone and just need the JPEG, JPEG Fine is the best option.
Autofocus
There are reasons to shift from manual focus to autofocus on the streets. Some of them are:
- You’re shooting not a candid scene but a street portrait
- Your lens has a tight focus (50mm or higher), so zone focusing becomes impractical
- You’re shooting at night
- Your lens doesn’t allow you to set the hyperfocal distance (e.g., 4m, 3m)
In these kinds of situations, it makes more sense to shoot automatic.
But this isn’t a problem in 99% of cases. For most people, this is why they buy Sony cameras in the first place—the autofocus is exceptional compared to its competitors. In fact, I set my most accessible custom(C1) button to toggle between autofocus and manual focus because you’ll likely face one of those scenarios on the street more often than not.
Here are the best autofocus settings for the highest success rate.
- Focus mode: AF-C (Continuous Autofocus)—the camera continuously adjusts focus as the subject moves, perfect for busy streets.
- Focus area: Wide / Tracking (Lock-on AF)—the camera automatically detects and tracks subjects across the frame. Sony does this really well, so you don’t have to worry about missing a shot.
- Pre-AF: lets the camera continuously focus even before you press the shutter halfway. I choose to turn this off because more often than not, it hunts for subjects I have no interest in.
Night Street Photography
Night street scenes are a different game. First of all, there’s hardly any light. That means shooting with a small aperture like f/8 isn’t possible—you need to let the lens get more light into the sensor.
The problem is, when we go from, say, f/8 to f/4 or even f/2.8, zone focusing becomes tricky and then almost practically impossible to work with. The working distance gets narrower and narrower with increasing aperture diameter (going from f/8 to f/2.8).
What this means is that at night, the best option is to shoot with autofocus.
Here are the best settings for the highest success rate in night street photography:
- Mode: Aperture Priority (A)
- Aperture: f/4 to f/2.8 or wider, of your lens allows it
- Shutter Speed: Minimum 1/120s
- ISO: Auto ISO, max 6400
- Focus Mode: Autofocus(AF-C, Continuous autofocus)
Silent Shooting and Shutter Choices
There’s always hustle and bustle on the streets, so the shutter sound isn’t really a problem. Also, you’re most probably not shooting indoors.
However, there are some cases where you either need to get really close to a subject and take a candid picture, or the crowd is silent. Using electronic shutter is ideal for these kinds of situations. Choosing electronic shutter for cases like these isn’t just about stealth—it’s about respect and awareness.
Lens Choices
Lens is a creative choice, and it makes all the difference. For instance, someone who chose to shoot with a 35mm is a completely different photographer from someone who chose to shoot with a 50mm.
No one is better than the other, of course, but it’s important to know the differences.
- 24–35mm primes: Classic street perspective, immersive and flexible.
- 24mm: Wide and energetic.
- 50mm: More deliberate, tighter framing.
- 16–50mm kit lens: Great for learning, and versatile for a broad range of styles of street photography
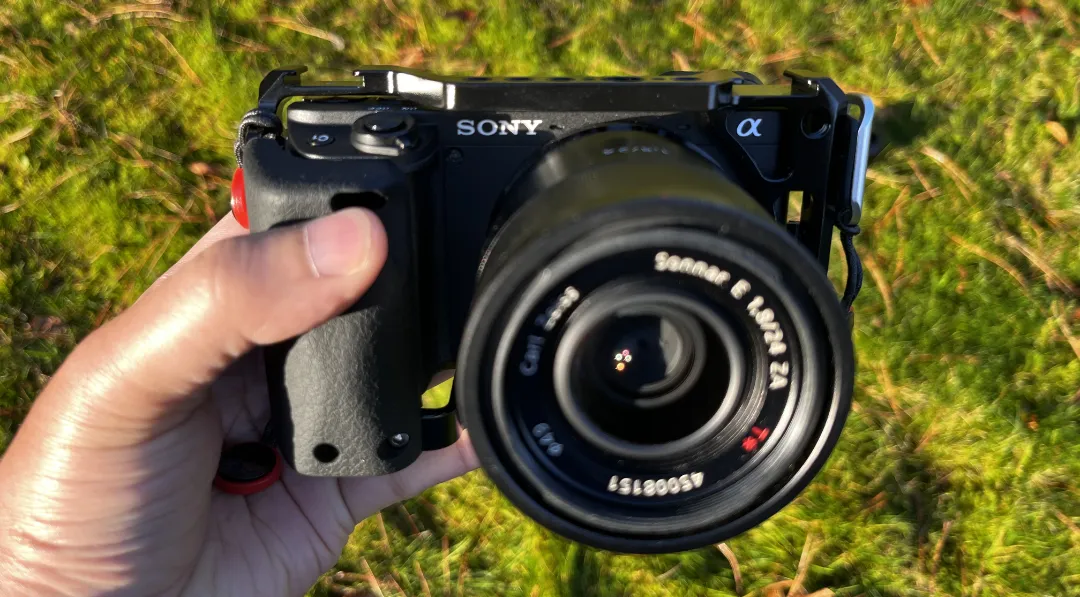
Silicone handgrip
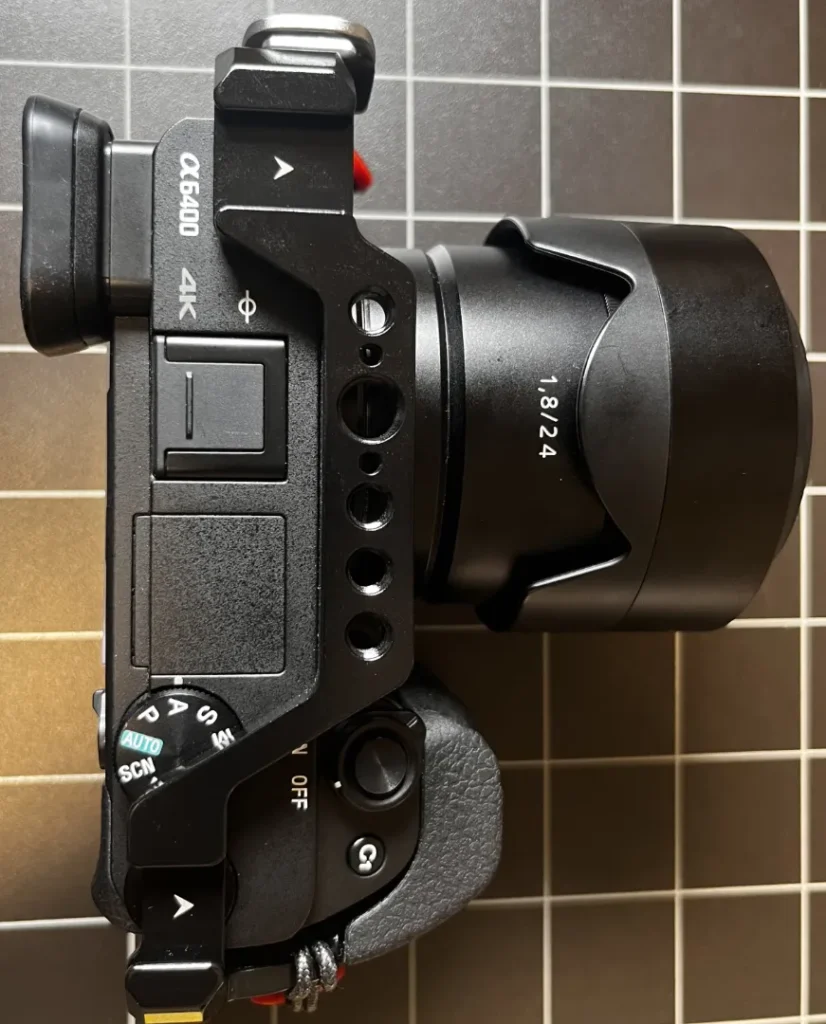
Any camera in the Sony A6000 series is an extremely well-engineered machine. However, after a couple of months of using it, one thing kept nagging me. The grip of the handle wasn’t designed to hold it for long periods. It was small, and my fingers kept hitting the face of the camera next to the lens.
A cage with a silicone grip solved this problem—and all the other problems mentioned below.
- The camera felt too small and light, and the cage solved this.
- When I take portraits, the bottom side of the cage helps me handle the camera well.
- The bottom side of this cage is an in-built Arca Swiss plate, so I don’t have to spend more money or deal with the hassle of having a quick-release Arca Swiss plate when I want to mount the camera on a tripod or camera stand.
Techniques
To get the best out of the settings mentioned in the two sections above, they should be combined with shooting techniques. Here are some of them:
Shooting from the hip
Shooting from the hip is helpful for many reasons in street photography. First, it keeps you unobtrusive and less noticeable. In other words, it lets you blend in with the crowd, which is the ultimate superpower of a street photographer.
Second, it lets you react extremely fast. There’s a fraction of a second where your brain is logically thinking, “Would the next fraction of a second create an interesting scene?” If you wait for your mind to say yes and only then raise the camera to take the photo, you might miss the shot. Because it takes another fraction of a second to raise the camera. If you shoot from the hip, you’re well aligned with time and your mind, and the camera is always ready.
Third, it frees you to move while shooting instead of planting your feet and lining things up.
The soft draw
What I call the soft draw is a natural evolution of shooting from the hip. Instead of shooting from the hip, you rest your camera on your shoulder.
Unlike the shooting-from-the-hip technique, this way, the camera angle is more predictable, so you’re in much more control of the frame. Also, when the camera rests on your shoulder, it’s already aligned with your chest and neck. This helps you gain readiness when you’re ready to shoot.
Also, this is more unnoticeable—obviously more than raising your camera, but also more than shooting from the hip.
To see this in practice, watch how New York photographer Dustin Roderick and London photographer Cal Holland do this.
- Call Holland: see timestamp: 08:00
- Dustin Roderick: see timestamp: 02:15
Swing-focus
Sometimes you’re walking down the street and see a really nice background. But you need a subject to fill the frame.
This is where you can get the best out of zone focusing—you prefocus the zone and wait for a subject to come into your frame. For instance, say you’re at f/8 and already set your focus distance to be 4 meters (for the Sony A6000 series, with a lens with 24mm focal length). With these settings, your subject will be in focus from 2.14 meters in front of you to infinity.
So all you have to do is wait.
This works really well, especially with fast-moving subjects, because you don’t have to press the shutter button halfway to autofocus—you save that fraction of a second.
Part 4: My custom button setup and memory recall presets
The A6000 series allows you to set up presets and recall them when you need to. This comes in real handy when you need to completely change your setup in seconds.
For example, even though I want to shoot mostly candid shots, sometimes I want to shoot street portraits. It wouldn’t be nice to keep your subject waiting while you change your camera settings. The way I deal with this is to set up my street portrait settings as a memory recall, and then, using a custom hold (Image 1, ‘Recall Custom Hold 3’), I immediately shift all the settings to portrait mode.
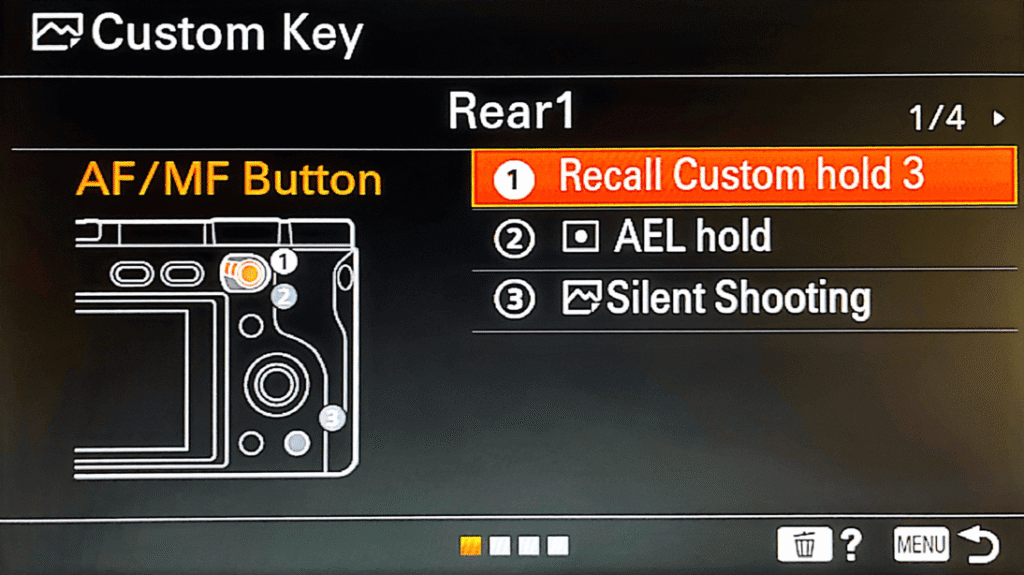
I find this is the most efficient way to do it, and it works much faster than just setting up a memory recall and then rotating the mode dial from A (Aperture Priority) to MR (Memory Recall) and then choosing one, which takes at least 5 seconds. But with a custom hold, you can do this within just a fraction of a second.
Here’s how to set up a memory recall preset.
How to set up memory recall
Set up the configuration that you want to save as a memory recall preset
This includes:
- Mode (A, S, M, etc.)
- Aperture/shutter / ISO
- AF mode + AF area
- Drive mode
- White balance
- Picture profile
- Metering
- Any custom buttons (those are saved too)
Press the MENU button
Go to:
Camera Settings tab (the camera icon)
→ Memory (this is usually on Page 1 or Page 2, depending on the model)
It will say: Memory / Memory Recall.
Choose a slot to save it
You’ll see:
- 1
- 2
- 3
- M1–M4 (on SD card)
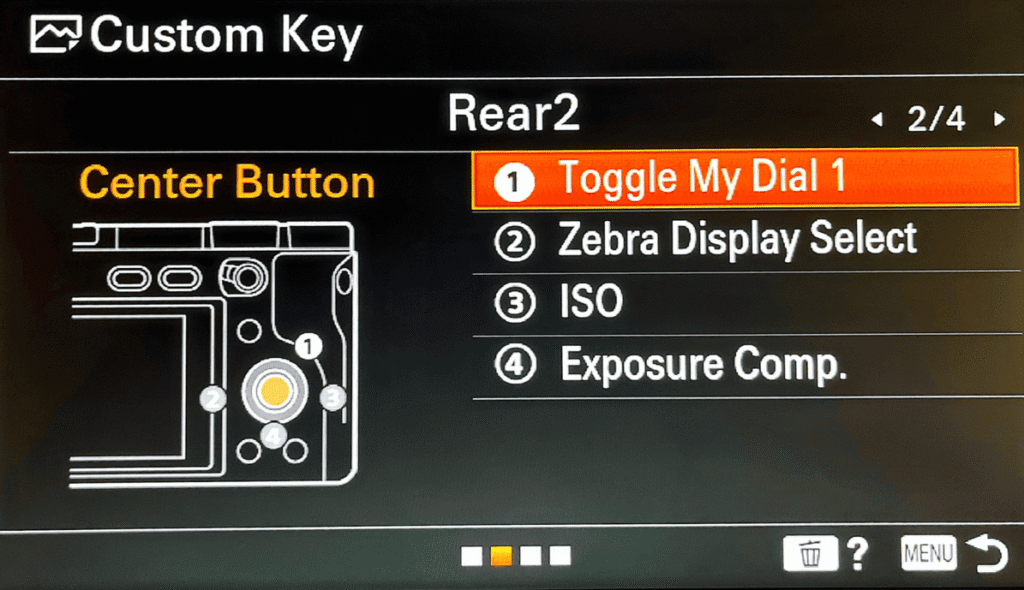
Highlight the one you want → press OK / Center Button.
That’s it.
Your setup is now saved.
How to Recall (Load) a Memory Setting
Turn the Mode Dial to MR (Memory Recall).
You’ll see your saved setups:
- 1
- 2
- 3
- M1–M4
Choose the one you want → press OK.
The camera instantly switches to that exact configuration.
Set up a hold to recall a memory temporarily
Assign a custom button to “Recall Custom Hold” (MENU → Camera Settings → Custom Key → choose button → Recall Custom Hold → select memory), then hold that button to temporarily load the preset.
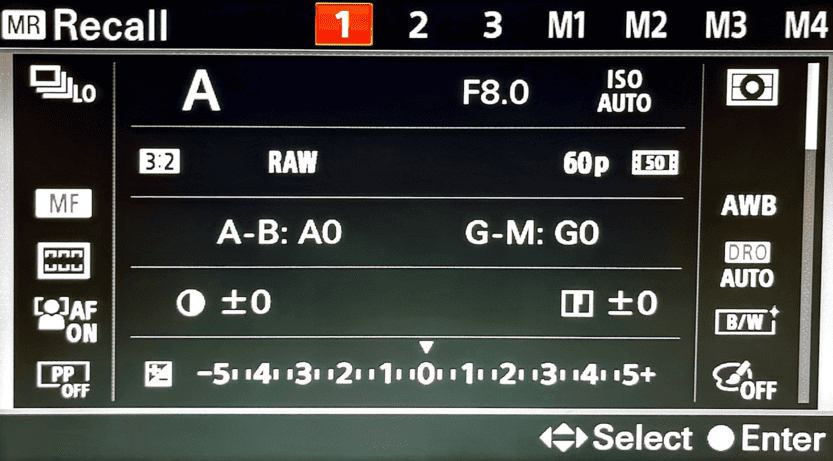
Daylight Walkaround preset
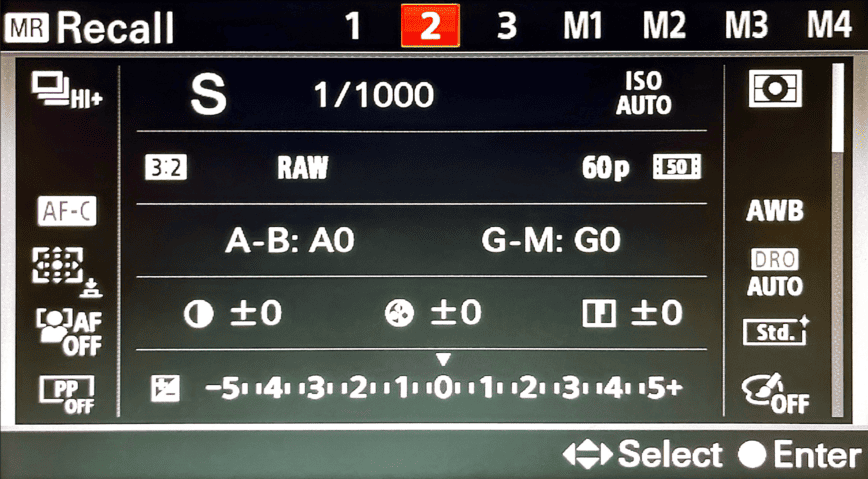
Street portraits preset

Fast Motion preset
Part 5: Conclusions
The camera is a tool, not a miracle-worker; sharpness or lens quality helps, but readiness, simplicity, and instinct matter more. Also, stealth and adaptability often count more than gear perfection in street photography.
Because street photography isn’t about setting up the perfect camera configuration on day one. It’s about building a workflow that gradually shapes the camera around the way you see. The process is simple: shoot first, review later, and pay attention to the one thing that slowed you down. Maybe your focus was missed. Maybe your shutter was too slow. Maybe the camera felt clumsy in your hands. Whatever it is, fix just that one thing before your next outing.
When you repeat this cycle week after week, the camera slowly disappears as an obstacle. Settings turn into instinct, adjustments become automatic, and you stop thinking about the camera altogether.
That’s when your real photography begins—when you’re no longer fighting the camera but fully paying attention to the world in front of you.
Frequently Asked Questions
Should I shoot manual mode or trust the camera (auto / semi‑auto) when doing street photography with a Sony A6000?
Any Sony A6000 series camera—or any other modern camera you buy—is a well-engineered machine. Not trusting a camera you probably bought for more than a thousand dollars doesn’t make any sense.
On top of this, on the streets, things change within a fraction of a second. If you set your camera to manual mode, you’ll more likely have to change your settings when you walk from open space into an alleyway. This, in return, takes your focus away from the street and puts it on the settings.
This creates friction.
Even though a shooting manual has its own advantages—like portrait work, where time is something you have on your side—on the streets, this doesn’t work. You don’t own the streets. You’re just a visitor.
The best settings for street photography with a Sony A6000 camera are therefore Aperture Priority with Auto ISO (set the upper limit to 3200 for daylight and 6400 for nighttime).
Is it realistic to “set it and forget it” — i.e., use a fixed base configuration for most street walks?
It’s not just realistic—it’s necessary.
The whole point, especially in street photography, is to not let the camera get in your way and let you focus more on what you want to capture, not on how you use your camera to capture it.
The best way to do this—to free yourself from constantly worrying about camera settings—is to have a base configuration. As famous photographer Weegee said, set f/8 and forget it. A small aperture like that gives you a long depth of field to work with (depending on your lens of choice), so you don’t have to worry about out-of-focus images.
This works much better when combined with zone focusing.
Is the kit lens (e.g., 16–50 mm) “good enough” for street photography, or should I invest in primes?
The best lens for street photography is the one you have right now!
That said, it’s important to have an idea of what kind of pictures you want to make. For instance, a shooter with a 35mm lens and a shooter with an 80mm lens are photographers with completely different visions.
Primes undoubtedly have higher quality than the kit lens or most zoom lenses in general. However, for just starting out, the 16-50mm kit lens is the best choice. The freedom you have to zoom in and out and see what you’re comfortable with will let you choose the right prime lens that you’re eventually going to buy down the road—instead of just buying one upfront, spending a lot more money without thinking.
In other words, starting with a kit lens lets you make a calculated decision down the road.
Should I rely on autofocus (AF‑C / zone / wide) or use zone‑focusing / manual focus?
Both of them work, and it depends on what you’re most comfortable with.
Zone focusing (manual focus), however, tends to give you absolute freedom because you’re prefocused—there’s not even a fraction of a second delay taking your shot. There’s no need to half-press the shutter button or any delays as such.
However, there are situations where manual focus doesn’t work, especially if you shoot at night and/or your lens has a tightly focused focal length, like 50mm or higher. In these kinds of situations, autofocus (AF-C, Continuous Autofocus) is the best option.
What are “good base settings” for exposure when walking around (aperture, shutter speed, ISO)?
- Mode: Aperture Priority (A)
- Aperture: f/8
- Shutter Speed: Minimum 1/120s
- ISO: Auto ISO, max 3200(in daytime, 6400 at night)
- Focus Mode: Manual focus(For zone focusing)
These settings are chosen on the principle “set it and forget it”—after you set them, they let you focus completely on the streets, not on the camera.
When light changes quickly (sun → shade → indoor), how do I prevent under-/over-exposure while staying ready?
Shooting on Aperture Priority (A) is a practical solution for this.
In daytime, setting the aperture to f/8, shutter speed to a minimum of 1/125s, and ISO to auto (Auto ISO, max 3200) lets the camera figure out the correct exposure when the light quickly changes. For any camera in the Sony A6000 series, when these settings are set, you no longer have to constantly think about the camera settings because it will take care of them.
At what shutter speed should I shoot to avoid motion blur when walking/shooting on the street?
A good rule of thumb is to shoot at least twice the focal length of your lens.
For instance, if your lens is 50mm, shooting at 1/100s will let you avoid motion blur. On the streets, setting the shutter speed limit to 1/125s–1/250s works well, unless you’re shooting fast-moving scenes.
When should I switch from autofocus to manual focus (e.g., in low light, night)?
The Sony A6000 autofocus system is highly versatile—the autofocus function isn’t clumsy, even in low light.
However, if you want to get the best out of street photography, the zone focusing technique—where you prefocus a zone by setting your focus point at a certain distance—is the most versatile choice. This way, you don’t have to half-press the shutter button to autofocus on a subject, and in return, it saves a lot of time.
So manual focus is the ideal achievement that autofocus is trying to reach—to reduce the time of focusing to zero—but will never get there.
For night street photography, what should be the approach to settings (aperture, ISO, shutter) on A6000‑type cameras?
At night, where there’s limited light on the street, you need to let as much light as possible get into the sensor.
To do this, make the aperture wide and set the ISO to higher numbers.
- Mode: Aperture Priority (A)
- Aperture: f/4 to f/2.8 or wider, of your lens allows it
- Shutter Speed: Minimum 1/120s
- ISO: Auto ISO, max 6400
- Focus Mode: Autofocus(AF-C, Continuous autofocus)
Is it better to shoot RAW + JPEG or JPEG only for street photography (especially if you move fast)?
JPEG files are much smaller and have less information stored in them compared to RAW files. This means the A6000 series camera lets you shoot more JPEGs compared to RAWs. The A6400’s spec sheet notes 99 (or ~116) JPEG frames versus 46 RAW frames in a single burst.
If you want quick results and minimal post-processing, JPEG is the way to go. But if you want flexibility to correct exposure or color later, RAW is your best choice.