

Obsidian is a personal knowledge management tool for anyone looking to organize and connect complex information and ideas. One of Obsidian’s key strengths is that even complex problems can often be handled with a remarkably simple setup.
Keeping this in mind, this guide is organized around four primary tasks:
- capture information;
- create and connect notes;
- find those notes when needed; and
- remove repetitive work with simple automation.
This guide uses only Obsidian’s core plugins. No community plugins are required.
By the end of this setup, the vault has the following structure:
My Vault/
├── Notes/
├── Daily Notes/
├── Templates/
└── Attachments/
This folder structure is intentionally minimal. Once you become comfortable with this simple setup, a more sophisticated one can emerge as your workflow demands it.
Before you begin
Application: Obsidian Desktop
Version: 1.13.7
Time required: About 15 minutes
Community plugins required: None
The screenshots in this guide use macOS. The Obsidian user interface is substantially the same on Windows and Linux, but some keyboard shortcuts may look different.
Table of Contents
1. Create a new vault
A vault is the folder where Obsidian stores your notes and configuration files.
If you already have a vault that you want to use, skip to Create the folders.
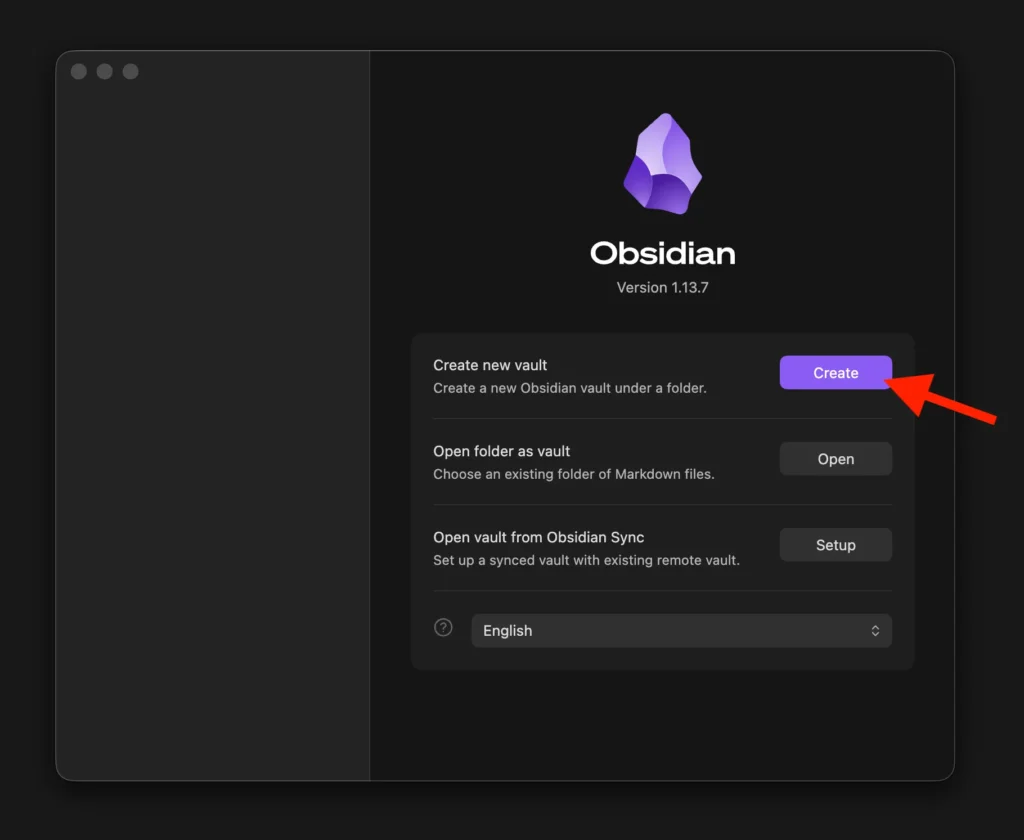
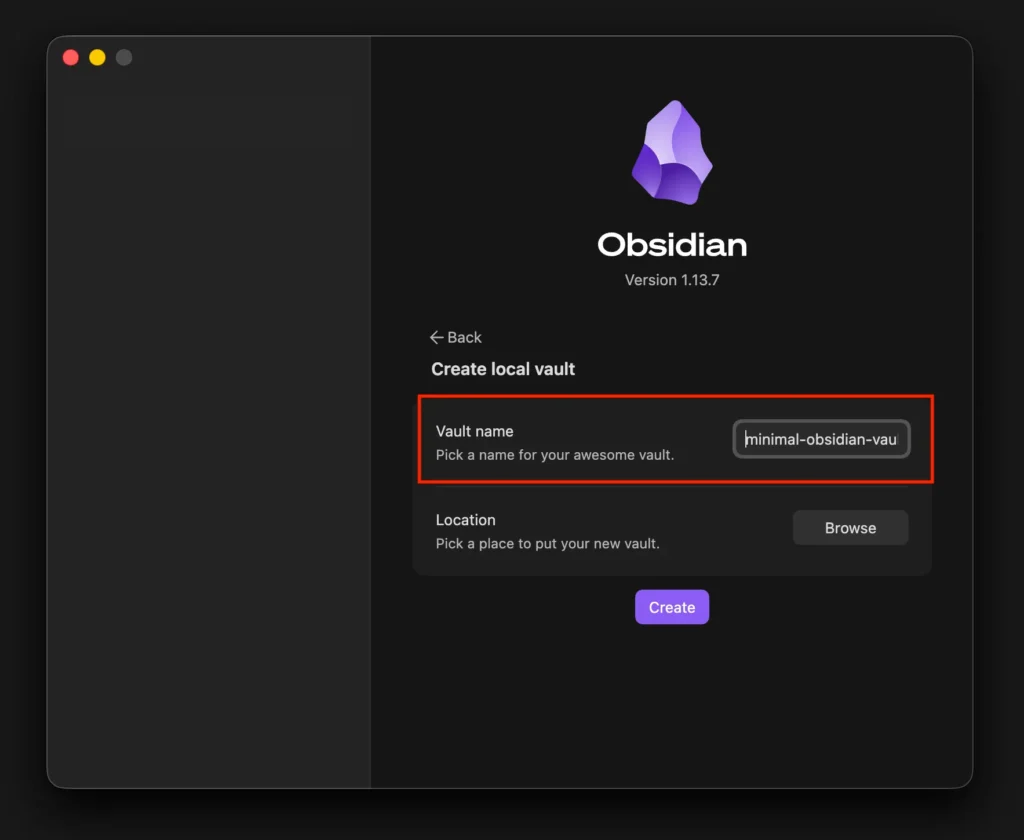
To create a vault:
- Open Obsidian.
- Next to Create new vault, select Create.
- In Vault name, enter a name for the vault.
- Select Browse, and choose where you want to store the vault on your computer.
- Select Create.
Obsidian opens the new, empty vault.
2. Create the necessary folders
Start with three folders:
Notes
Daily Notes
Attachments
Each folder serves a specific purpose:
| Folder | Purpose |
|---|---|
Notes | Stores regular notes. |
Daily Notes | Stores one date-based note for each day. |
Attachments | Stores images, PDFs, and other attachments. |
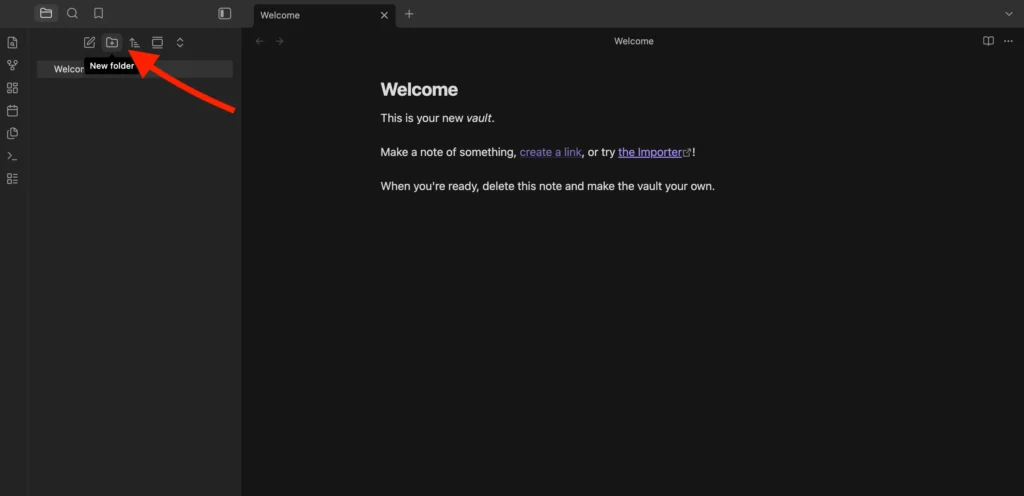
To create the folders:
- In the File explorer, select New folder.
- Enter
Notes, and press Enter. - Repeat the process to create
Daily Notes. - Repeat the process to create
Attachments.
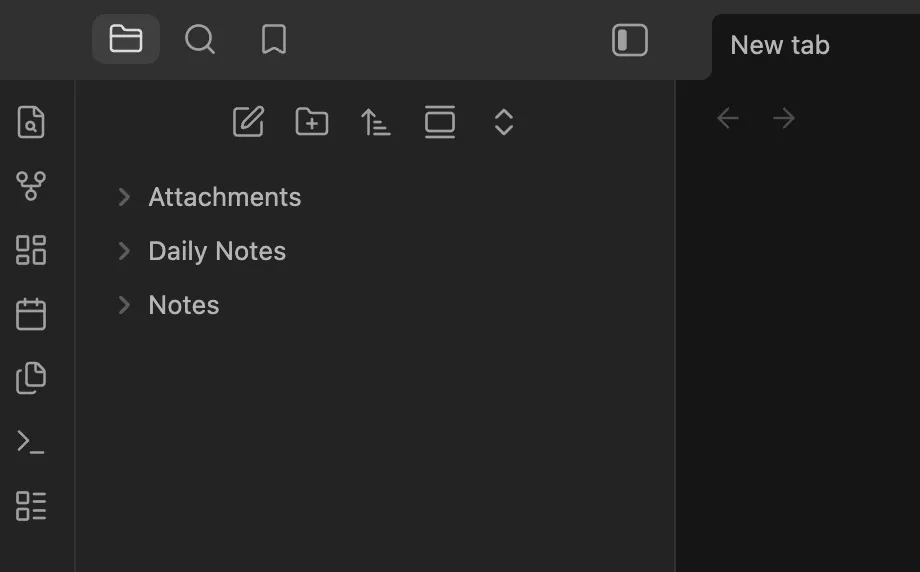
The File explorer now shows the three folders.
3. Set the default new note location
By default, newly created notes are saved in the root directory of the vault. For this setup, new notes should be saved in the Notes folder instead.
To change the default location:
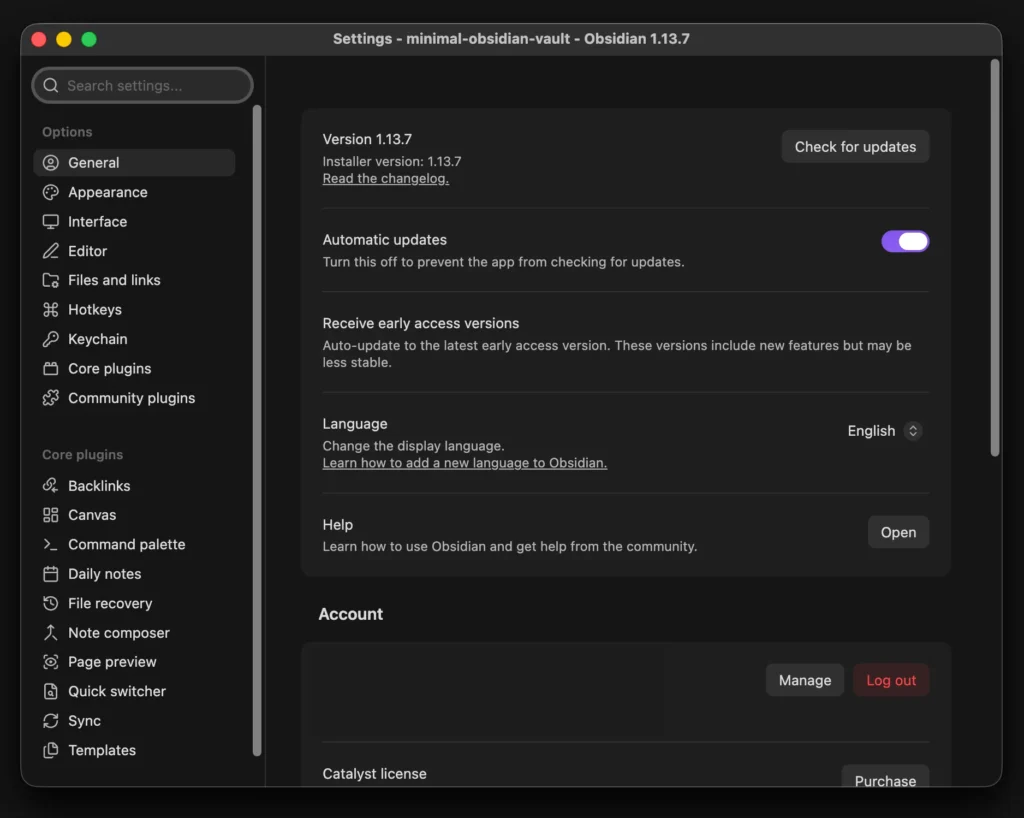
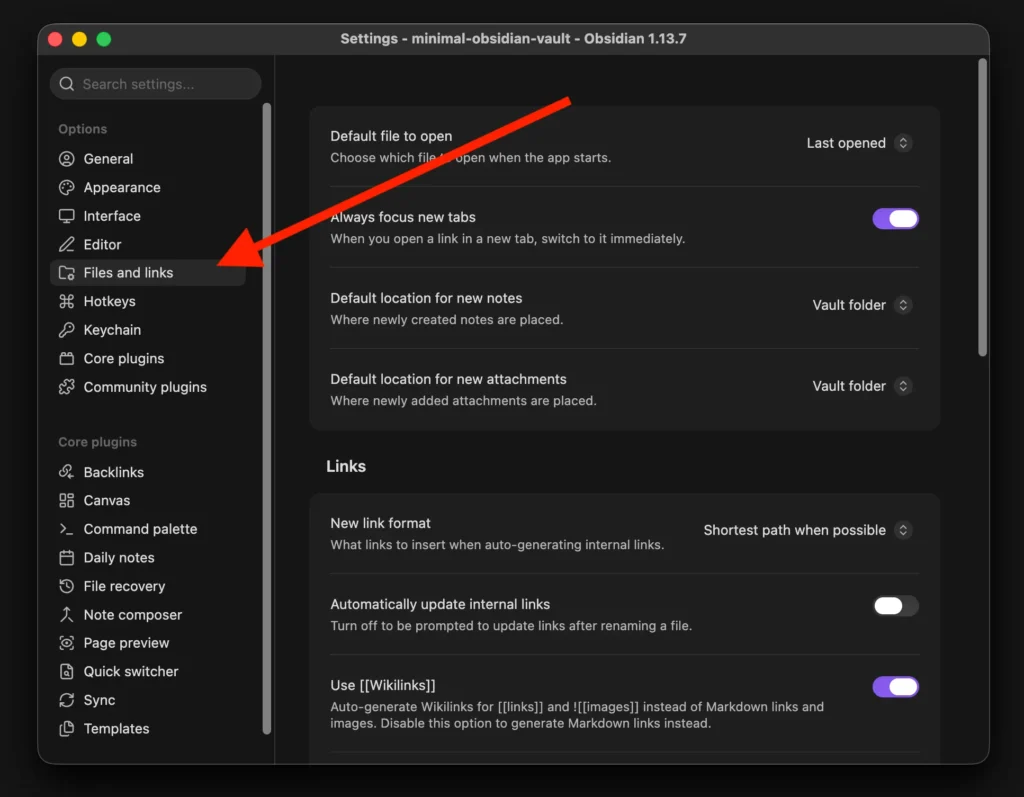
- Open Settings (or press
Ctrl+,on Windows and Linux, orCmd+,on macOS). - Select Files and links.
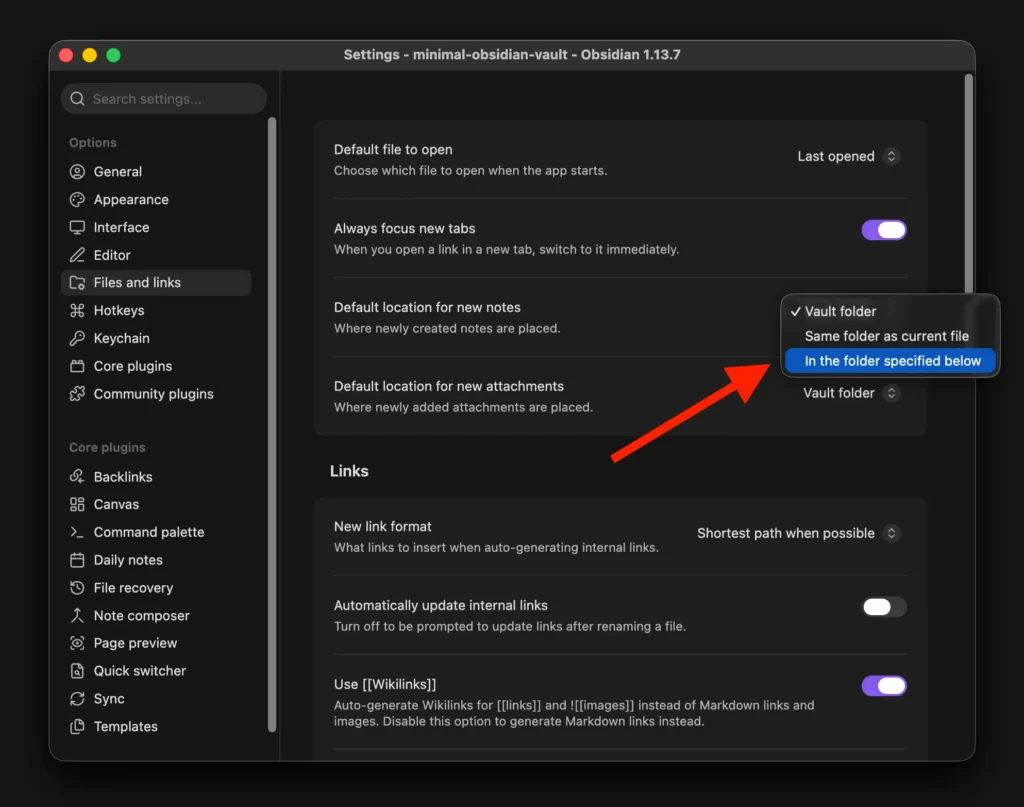
- Find Default location for new notes.
- Select In the folder specified below.
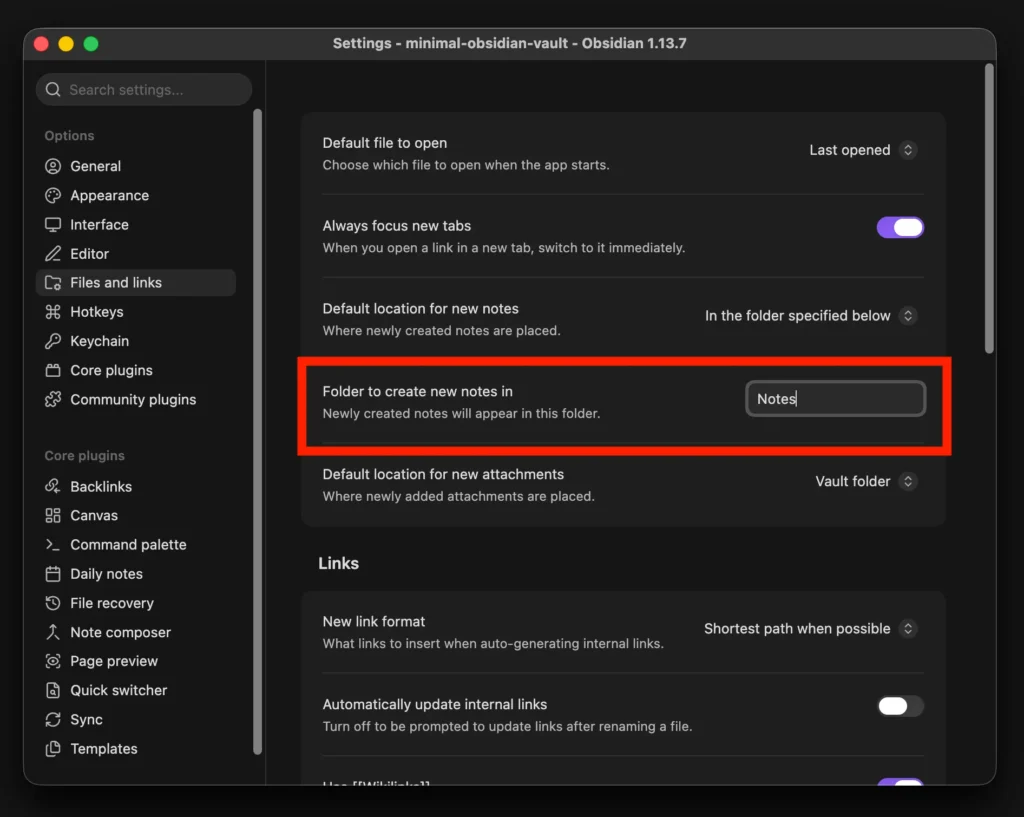
- For Folder to create new notes in, select
Notes.
New notes are now saved in Notes unless you explicitly create them somewhere else.
Result: You no longer need to create a note and then move it into the Notes folder.
4. Set the default attachment location
By default, Obsidian stores new attachments in the root directory. A dedicated Attachments folder keeps these files separate from your notes.
While you are still in Files and links:
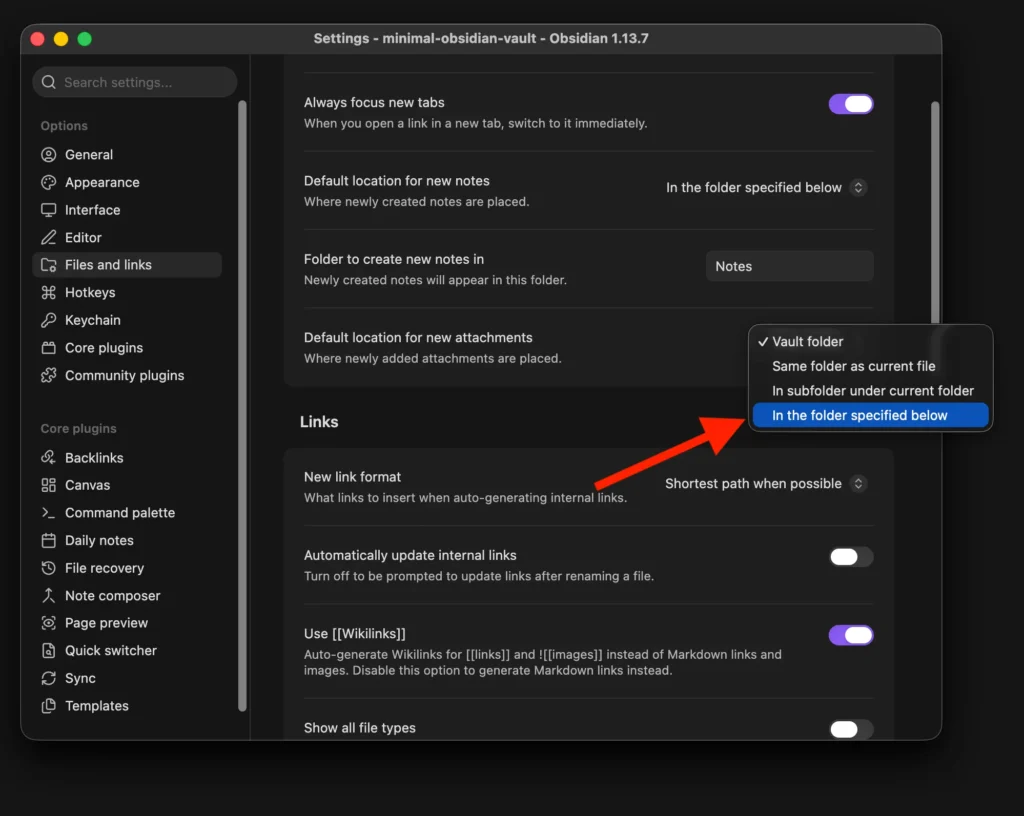
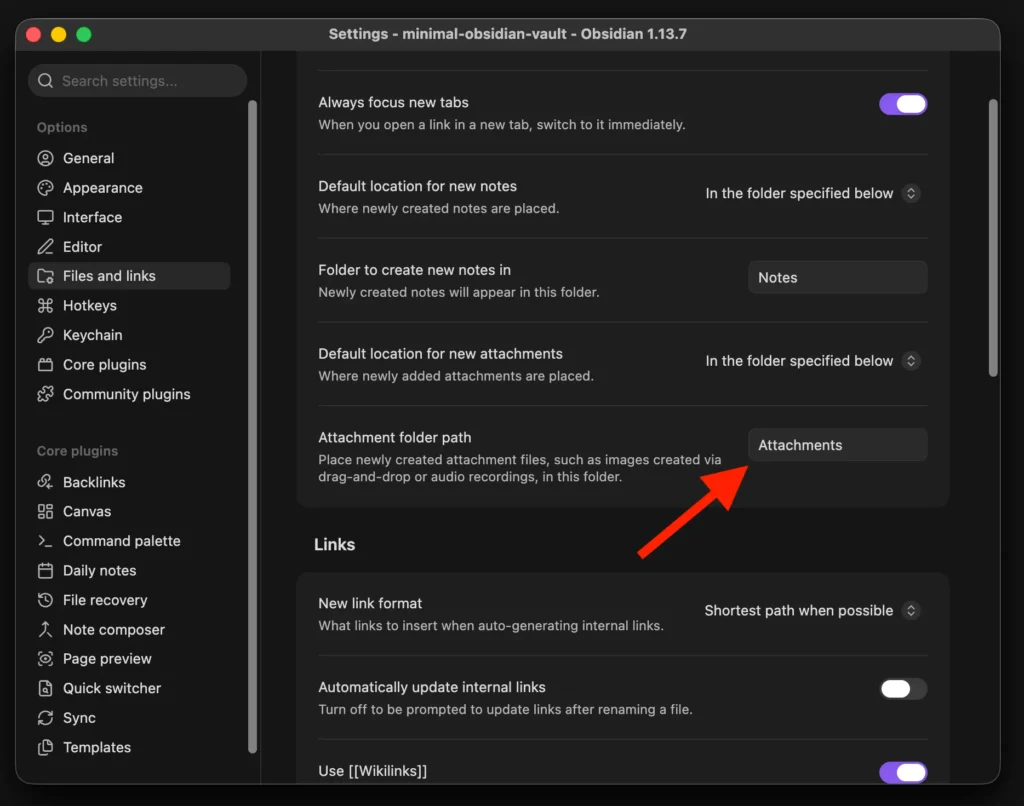
- Find Default location for new attachments.
- Select In the folder specified below.
- Select
Attachments.
When you paste or drag an image, PDF, audio file, or another supported attachment into a note, Obsidian automatically stores it in the Attachments folder.
Test the attachment setting
To verify the attachment setting:
- Close the Settings window.
- Create or open a note by pressing
Ctrl+Non Windows and Linux, orCmd+Non macOS. - Copy an image to your clipboard.
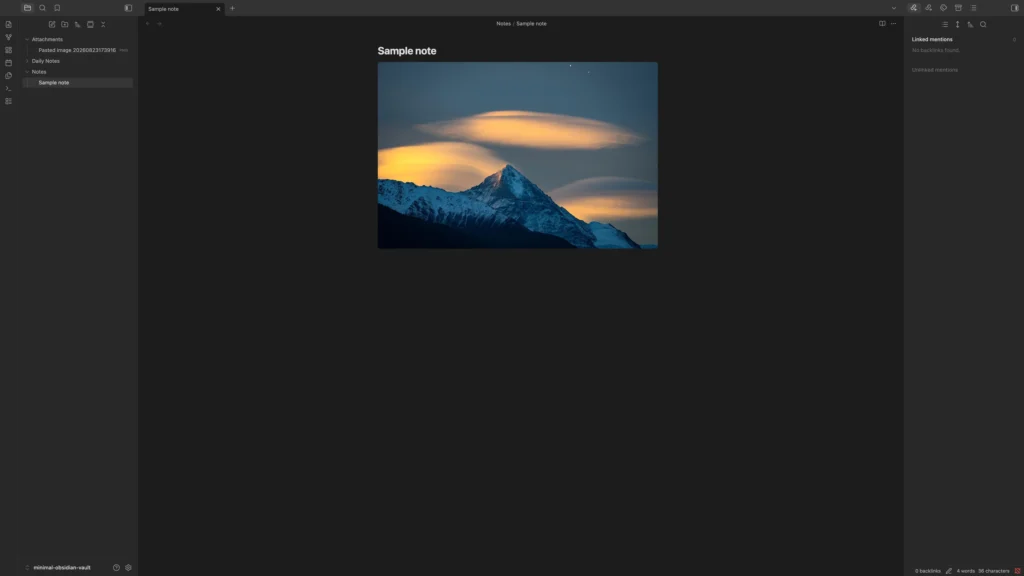
- Paste the image into the note.
- In the File explorer, expand
Attachments.
The image file should appear in the Attachments folder.
5. Enable Daily Notes
In addition to regular notes, you may need a place to capture information that does not yet belong to a specific topic or dedicated note. In this setup, these entries go into a daily note, a date-based note for the current day.
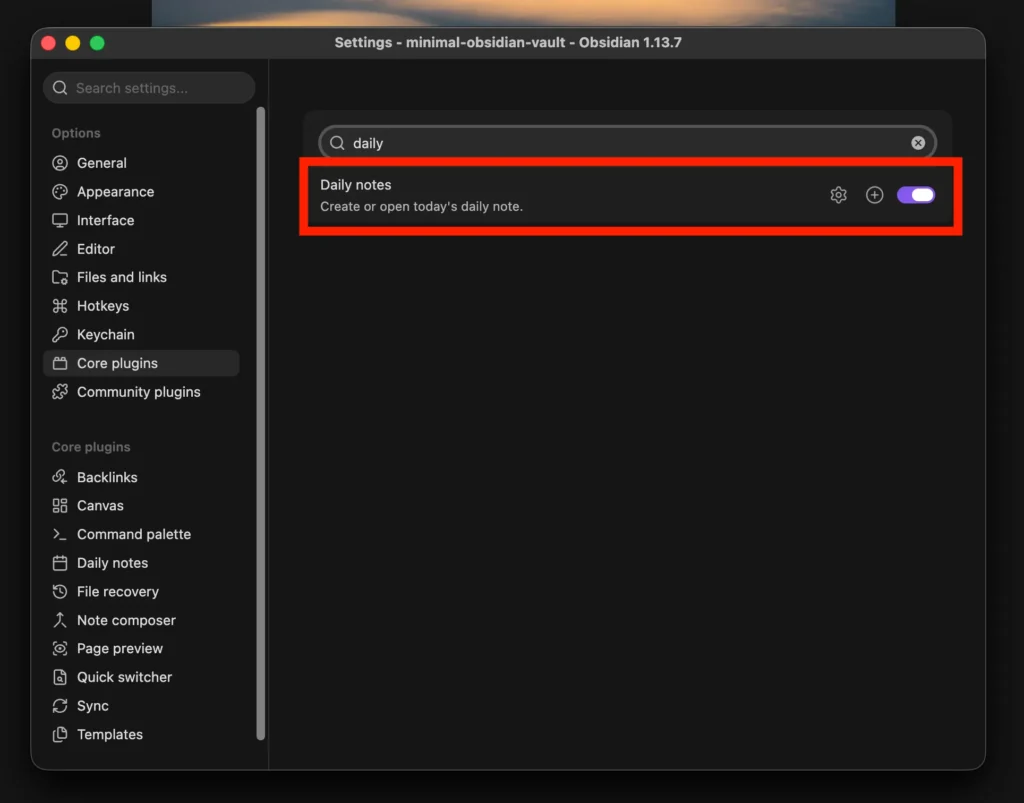
Obsidian’s Daily notes core plugin creates and opens these notes based on the current date.
To enable the plugin:
- Open Settings.
- Select Core plugins.
- Find Daily notes.
- Turn on Daily notes.
Configure the daily-note folder
Next, set a dedicated folder for these notes:
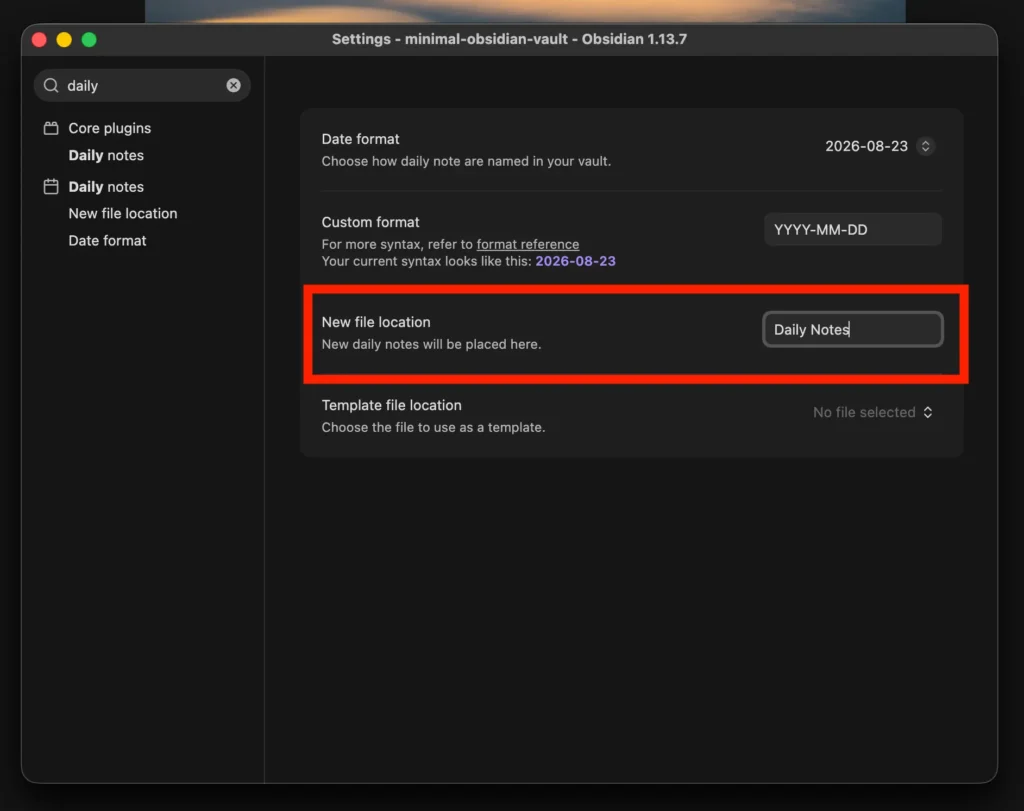
- In Settings, open Daily notes.
- Leave Date format as
YYYY-MM-DD. - For New file location, select
Daily Notes. - Close the Settings window.
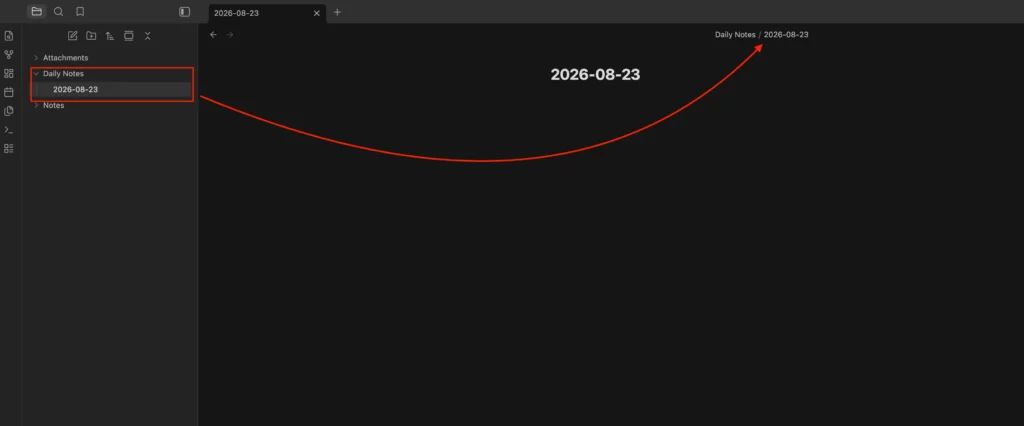
For example, a note created on August 23, 2026, is stored as:
Daily Notes/
└── 2026-08-23.md
Using the YYYY-MM-DD format also keeps the files in chronological order when sorted alphabetically.
Open today’s note
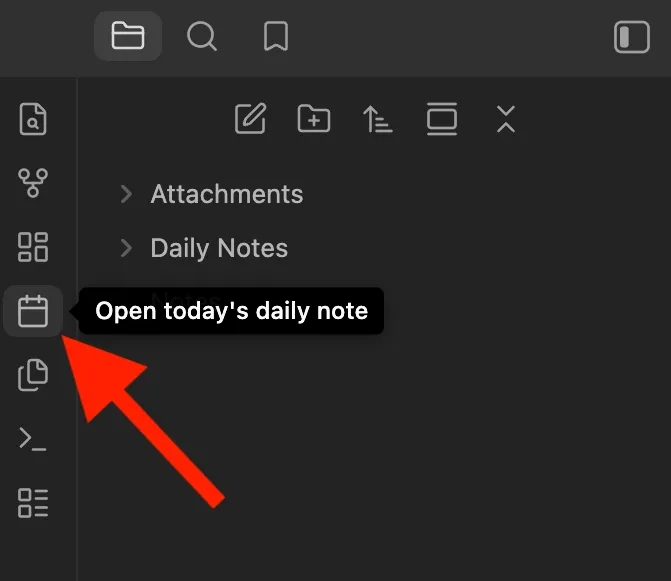
To open today’s note:
- In the left ribbon, select Open today’s daily note.
- If today’s note does not exist, Obsidian creates it.
- If it already exists, Obsidian opens the existing note.
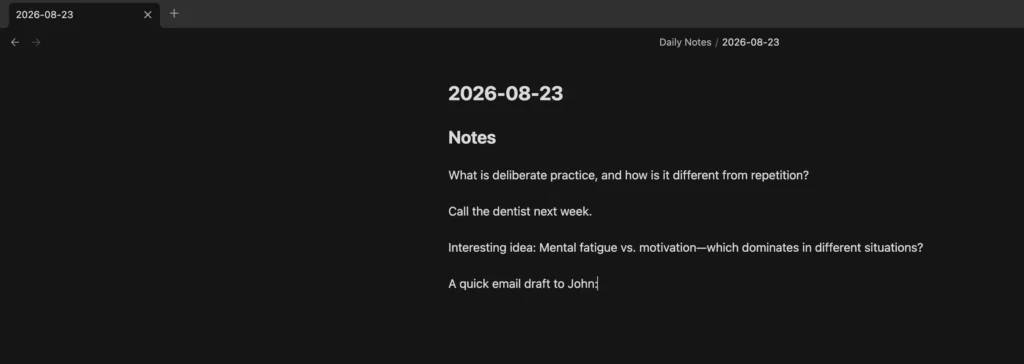
Daily notes are a low-friction note-taking strategy to capture information without having to decide immediately where it belongs.
For example:
## Notes

What is deliberate practice, and how is it different from repetition?

Call the dentist next week.

Interesting idea: Mental fatigue vs. motivation, and which dominates in different situations?

A quick email draft to John:
At this stage, do not spend too much time trying to categorize individual entries. Let the structure emerge gradually as recurring topics and note types accumulate in daily notes.
6. Create a regular note
Some information you capture in daily notes will eventually deserve its own note. For example, suppose one of your daily entries is:
What is deliberate practice, and how is it different from repetition?
This idea is worth developing further, so creating a separate note makes it easier to work with.
To create a regular note:
- Press Command + N on macOS or Ctrl + N on Windows and Linux.
- Enter
Deliberate practice. - Press Enter.
- Add content.
For example:
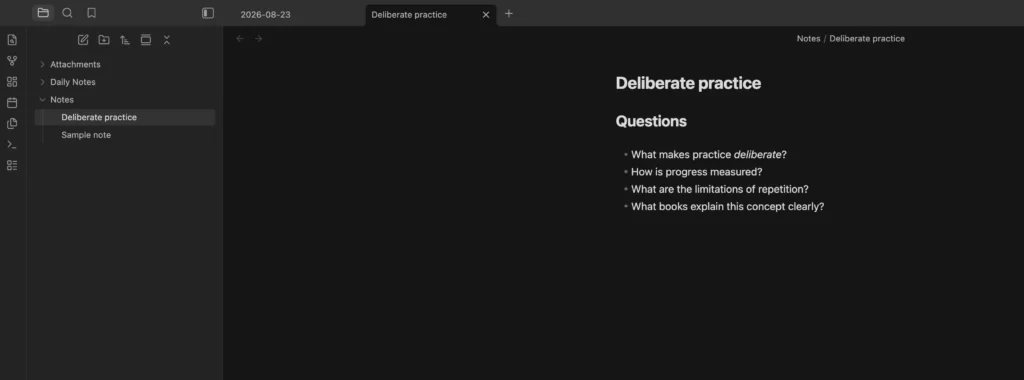
## Questions

- What makes practice deliberate?
- How is progress measured?
- What are the limitations of repetition?
- What books explain this concept clearly?
Because the default location for regular notes is already configured, Obsidian automatically creates this note inside the Notes folder.
7. Add simple YAML properties
As the number of notes in your vault grows, the folder structure alone may not be the most effective way to organize them. Obsidian’s built-in Properties feature provides a far better solution for this.
Properties are stored as YAML (YAML Ain’t Markup Language), a human-readable data format, at the top of a note.
Tip: To see how these properties can be used to organize and filter notes, jump ahead to Sort notes with Bases.
To add properties to a note:
- Right-click the note tab.
- Select Add file property.
- Enter the property name.
- Enter the property value.
- Repeat the process to add additional properties.
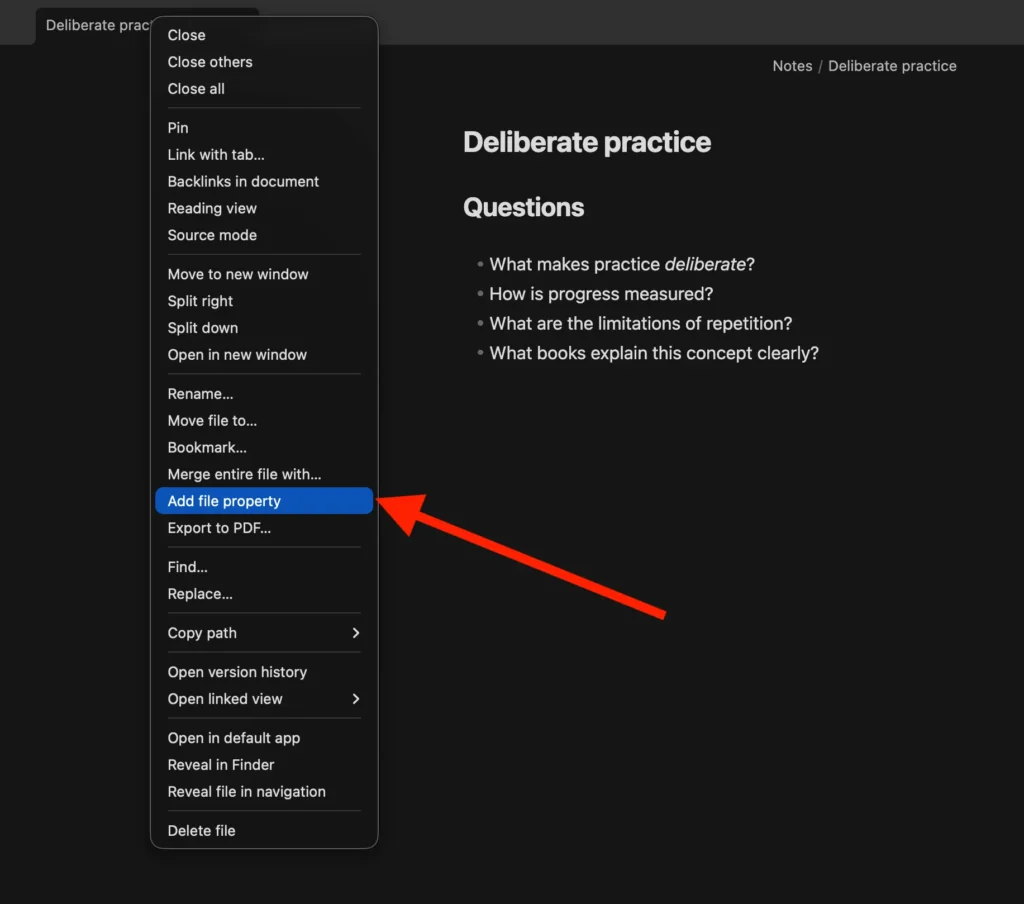
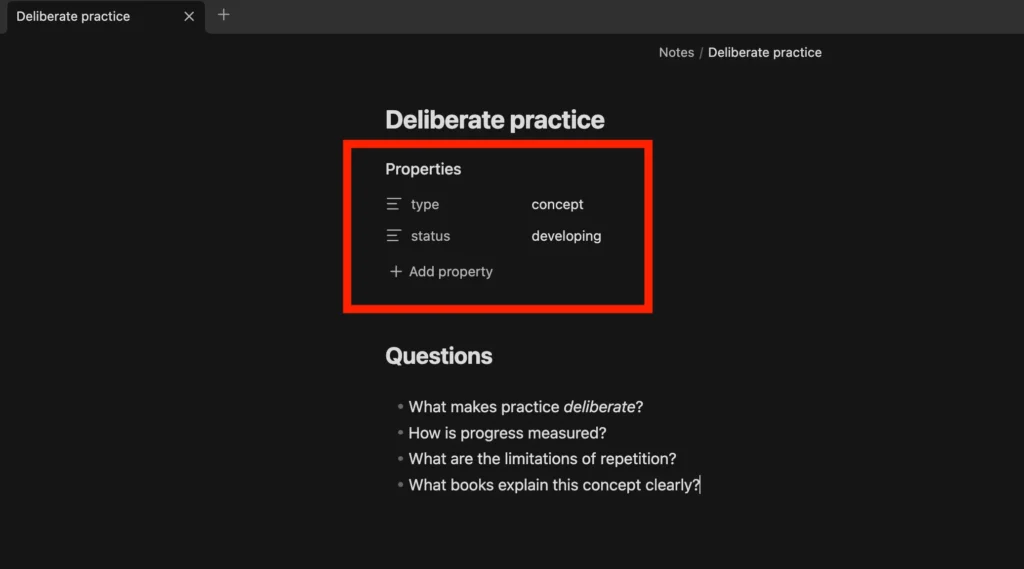
For example, add the following properties to the Deliberate practice note:
type: concept
status: developing
To add properties quickly, use the keyboard shortcut:
- Command + ; on macOS
- Ctrl + ; on Windows and Linux
The information is now structured as follows:
typedescribes what kind of note it is.statusdescribes its current state.
The note now contains both its content and structured information about that content:
A good rule of thumb is to use as few properties as necessary. Add a property when it serves a clear purpose.
With these properties in place, you can later find or group all notes with, for example:
type: concept
8. Link notes
Linking notes is one of Obsidian’s core features. It is a simple and efficient strategy to connect related ideas and build context around them over time.
For example, an idea may come to your mind, but it is not yet fully developed: How does deliberate practice affect learning? Rather than deciding immediately where that thought belongs, you can quickly capture it in the daily note.
After exploring the idea a bit further, you may want to create a dedicated note for this subject: Deliberate practice. Because thinking is rarely linear, you are likely to run into and develop the same topic across several other notes over time.
The real value of a personal knowledge management system like Obsidian comes from being able to see these related pieces of information together and understand how they connect. Wikilinks are a convenient way to create these connections. A wikilink is an internal link between two notes in the same vault.
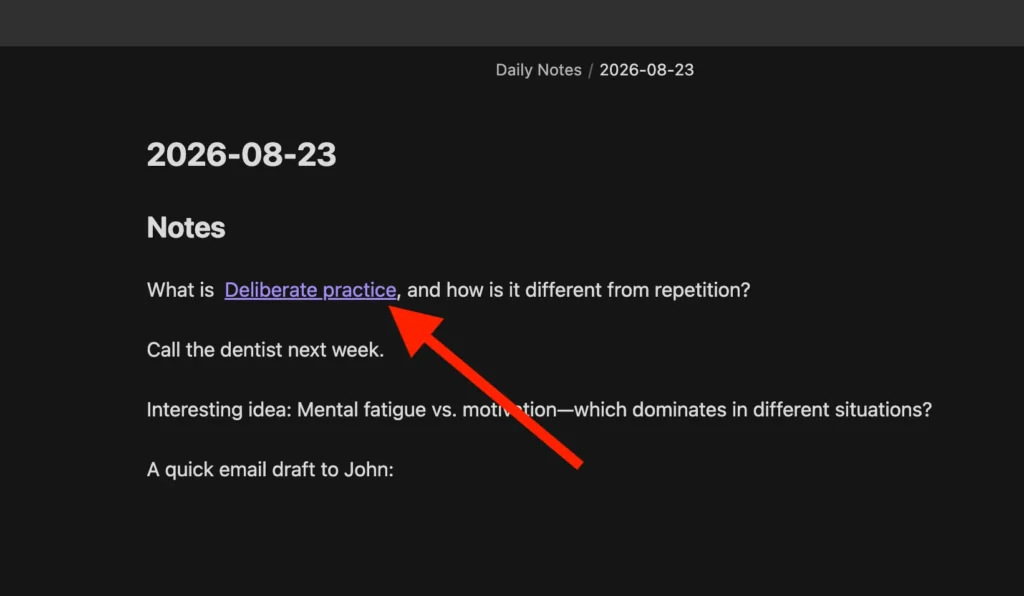
For example, open today’s daily note and convert the previous entry into:
What is [[Deliberate practice]] and how is it different from repetition?
Because Deliberate practice already exists as a note in the vault, creating the link is straightforward:
- Enter two opening square brackets:
[[. - Begin entering
Deliberate practice. - Select Deliberate practice from the suggestions.
The result is an internal link. Selecting it opens the Deliberate practice note.
![Obsidian daily note showing [[del]] entered with Deliberate practice displayed in the wikilink suggestion menu.](https://arunak.net/wp-content/uploads/2026/08/20-link-note-with-wikilink-1024x544.webp)
View backlinks
When one note links to another, Obsidian automatically displays that incoming link as a backlink in the linked note.
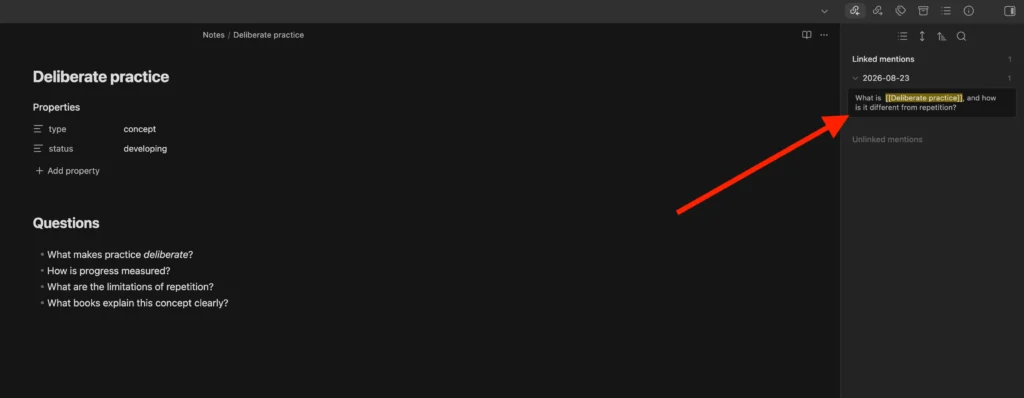
In this example, today’s daily note contains a link to [[Deliberate practice]]. When you open Deliberate practice, its backlinks show the daily note as a Linked mention.
To view the backlinks:
- Open the
Deliberate practicenote. - In the right sidebar, select Backlinks.
- Expand Linked mentions, if necessary.
- Find today’s daily note in the list.
Note: If the Backlinks tab is not available in the right sidebar, open the Command palette and select Backlinks: Show backlinks.
9. Find a note quickly without browsing folders
A well-organized folder structure has many benefits. But as the number of notes grows, finding a specific note by browsing through folders can slow you down.
Obsidian’s built-in Quick switcher is much faster at finding and opening a note by its name.
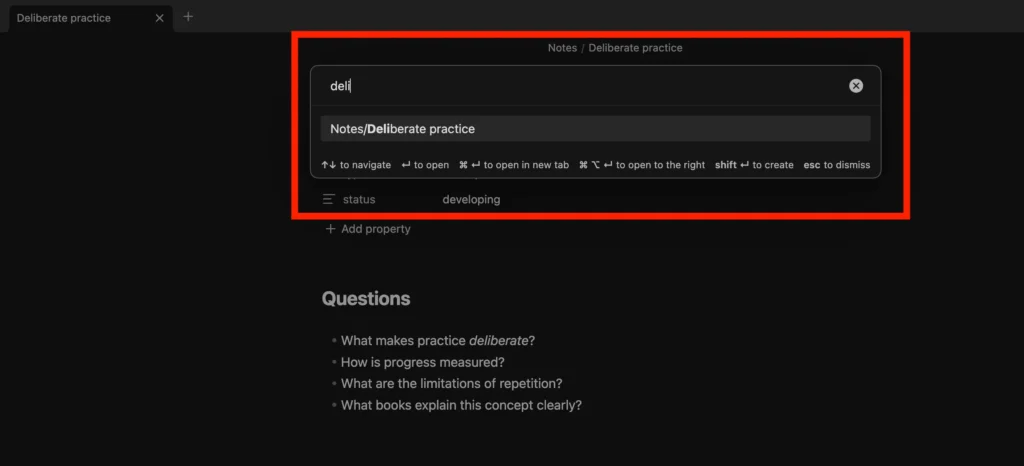
For example, to find the Deliberate practice note created earlier, use Quick switcher:
- Press Command + O on macOS or Ctrl + O on Windows and Linux.
- Enter part of the note name, such as
deli. Deliberate practiceappears in the results.- Use the arrow keys to highlight the note, if necessary.
- Press Enter.
Search by content when you do not remember the note name
There may be instances when you do not remember the name of a note. In this case, Quick switcher is less useful because it only searches by the title of the note. Obsidian’s built-in Search solves this problem by searching the text inside your notes.
Press:
- Command + Shift + F on macOS; or
- Ctrl + Shift + F on Windows and Linux.
Then enter a word or phrase from the note.
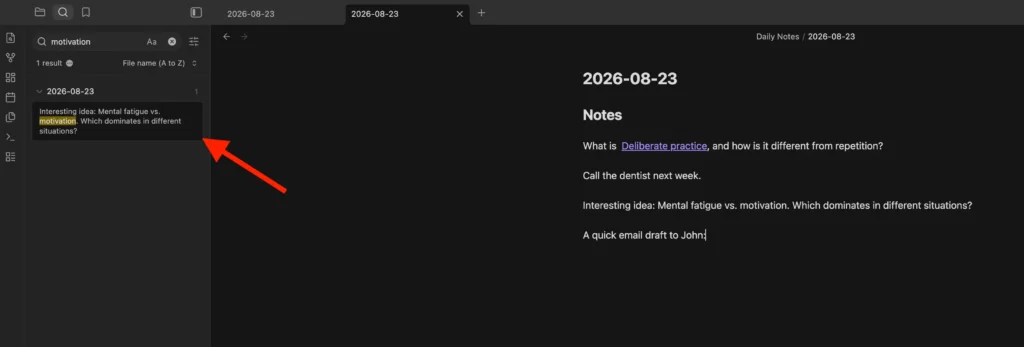
For example, searching for:
motivation
can find the daily note containing:
Interesting idea: Mental fatigue vs. motivation. Which dominates in different situations?
With links, Quick switcher, and full-text Search, you now have several ways to find information.
10. Create templates for recurring notes
The basic vault structure is now in place with the necessary functionality:
My Vault/
├── Notes/
├── Daily Notes/
└── Attachments/
As you continue using Obsidian, recurring patterns begin to emerge. For example, you may notice that you start each daily note with the same headings:
## Tasks for today

## Notes

## Interesting ideas
Recreating the same structure every day does not add meaningful value. This makes it a good candidate for automation.
Obsidian’s built-in Templates core plugin helps automate this process.
Create a Templates folder
- In the File explorer, select New folder.
- Enter
Templates. - Press Enter.
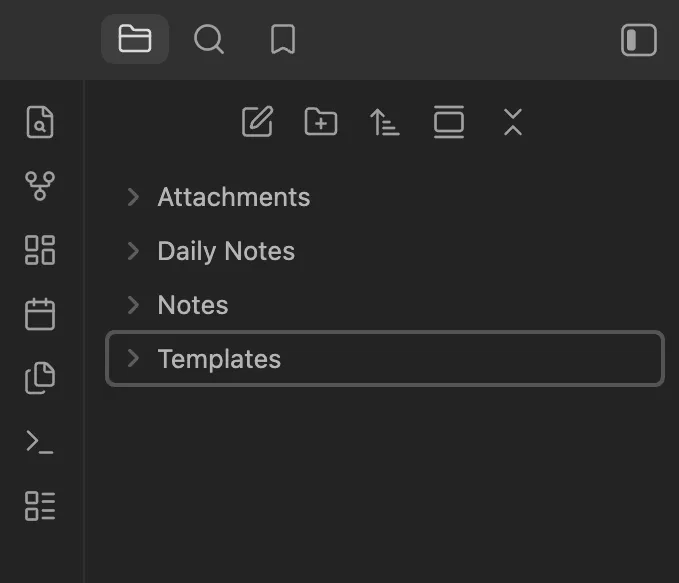
Your vault now contains:
My Vault/
├── Attachments/
├── Daily Notes/
├── Notes/
└── Templates/
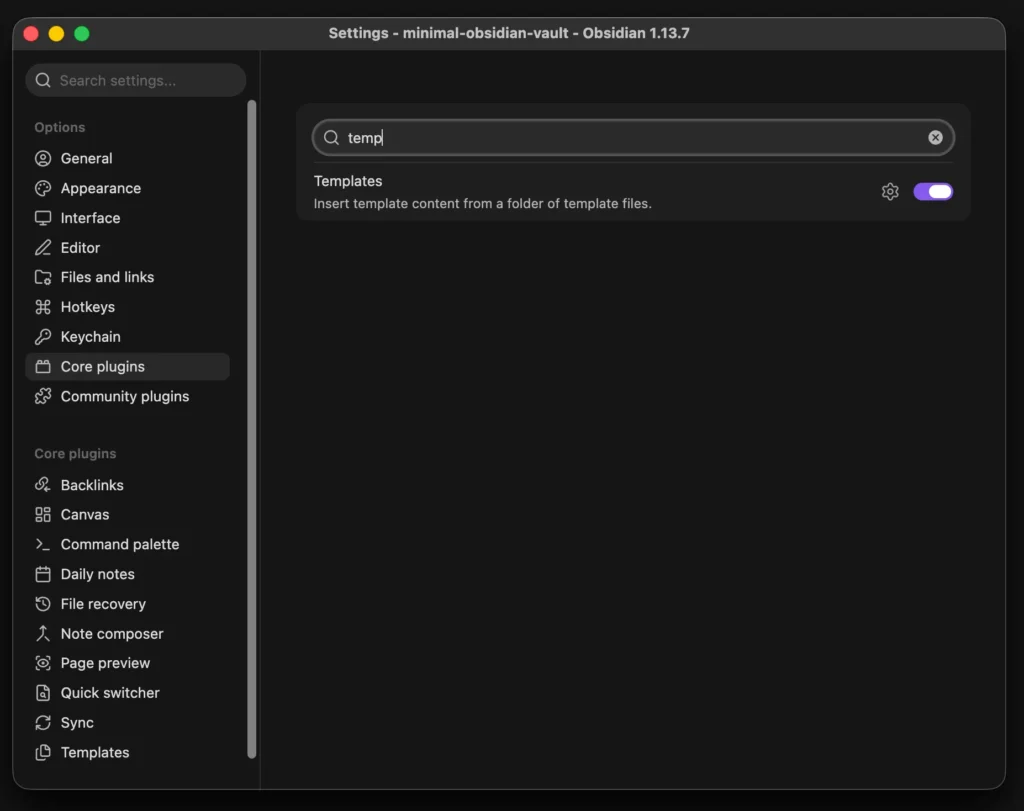
Enable Templates
- Open Settings.
- Select Core plugins.
- Find Templates.
- Turn on Templates.
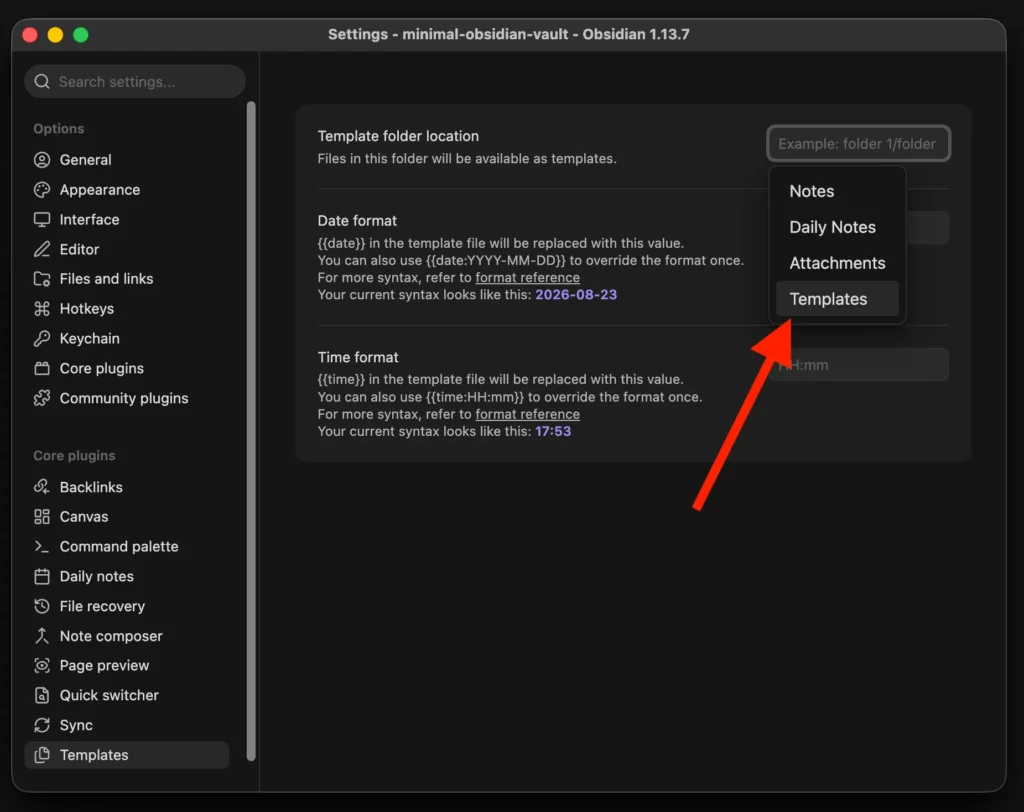
- Open the Templates settings.
- For Template folder location, select
Templates. - Close the Settings window.
Create a daily-note template
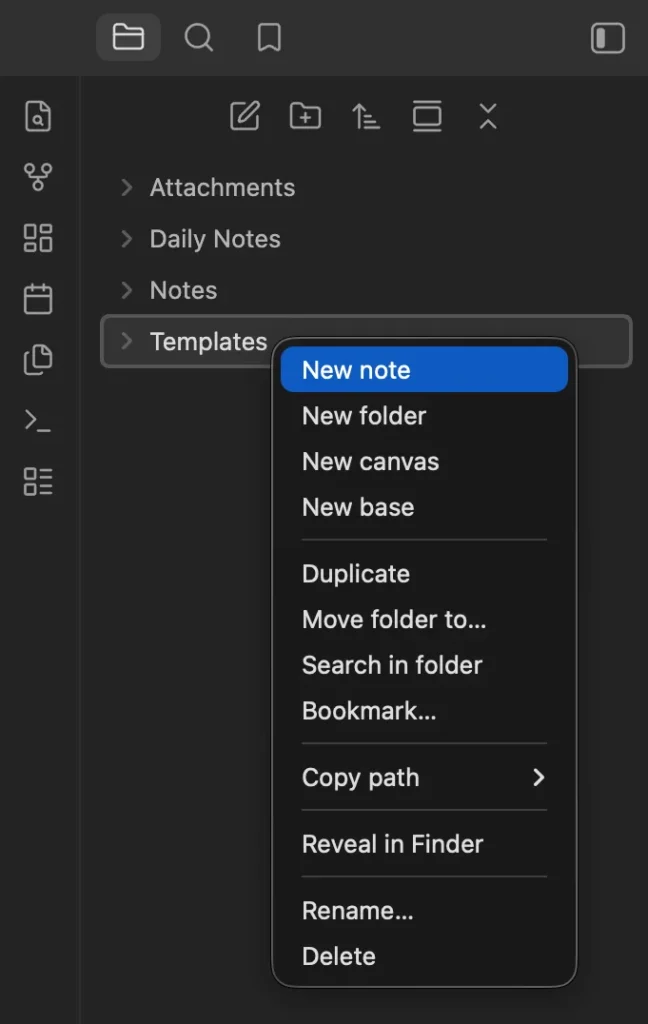
- Right-click the newly created
Templatesfolder. - Select New note.
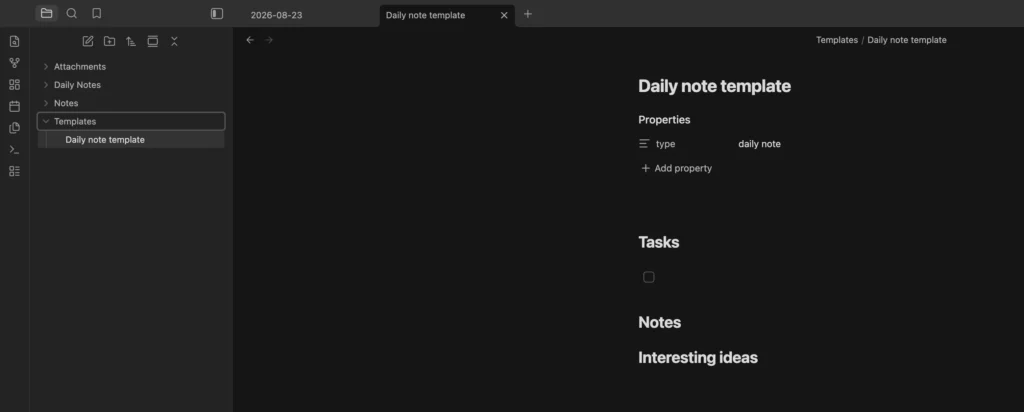
- Enter
Daily note template. - Add the following content:
---
type: daily note
---

## Tasks

- [ ]

## Notes

## Interesting ideas
The template now appears at:
Templates/
└── Daily note template.md
Apply the template to future daily notes
You can now configure the Daily notes plugin to use the template whenever it creates a new daily note.
- Open Settings.
- Select Daily notes.
- For Template file location, select
Daily note template.
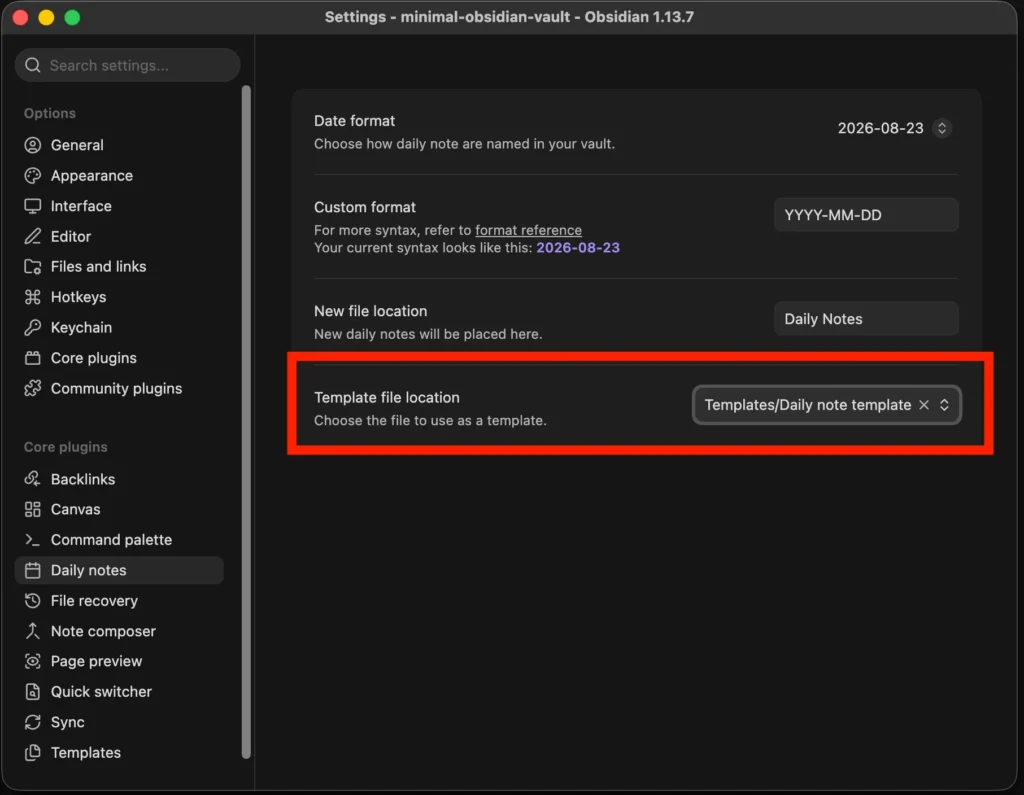
Obsidian now applies the template automatically when it creates a new daily note. It does not modify daily notes that already exist in the vault.
From this point on, a newly created daily note looks like this:
---
type: daily note
---

## Tasks

- [ ]

## Notes

## Interesting ideas
11. Sort notes with Bases
As the number of notes in your vault grows, you may want to view certain types of notes as a group.
For example, suppose you create several notes with:
---
type: concept
status: developing
---
Instead of finding these notes individually, you can use Obsidian’s Bases core plugin to create a view that displays only notes with type: concept.
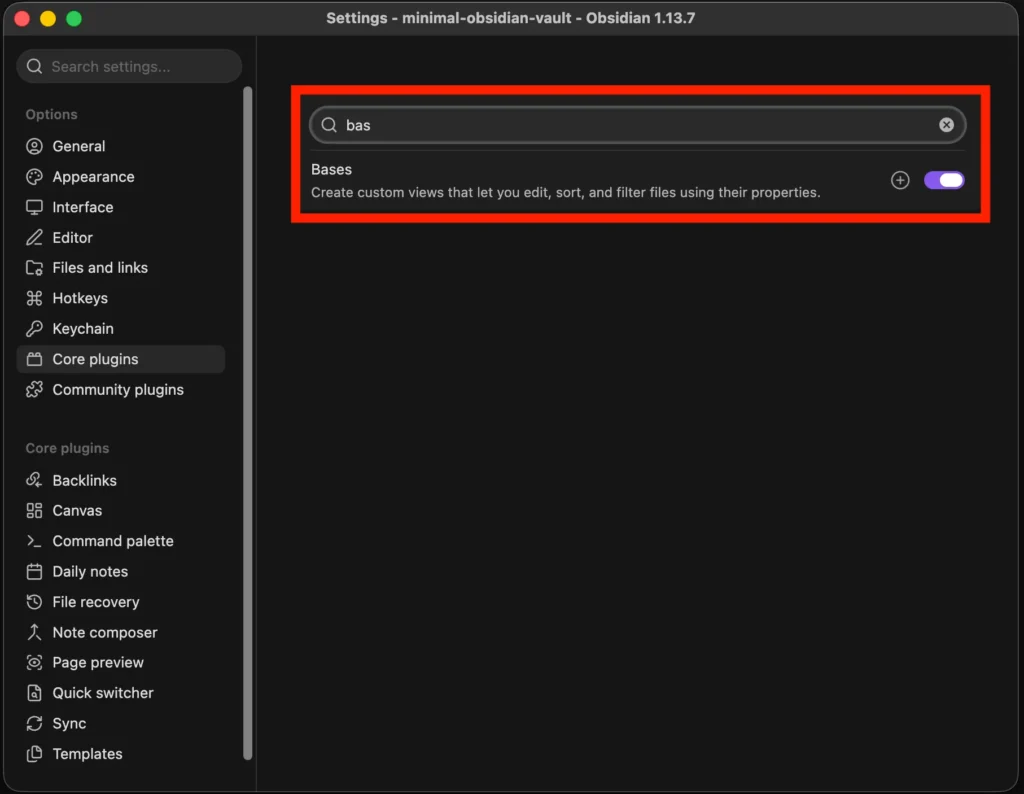
Enable Bases
- Open Settings.
- Select Core plugins.
- Find Bases.
- Turn on Bases.
Create a Base
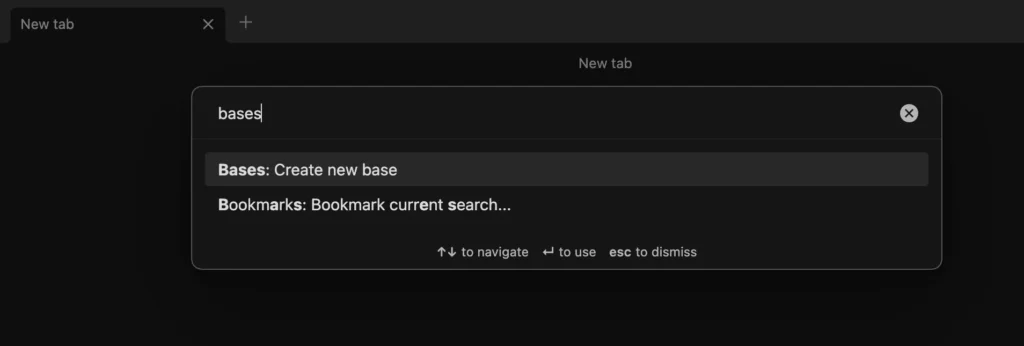
- Open the Command palette on the left side panel (alternatively, press
Ctrl+pon Windows and Linux, orCmd+pon macOS). - Search for Bases: Create new base.
- Select Bases: Create new base.
- Enter a descriptive name, such as
Concepts.
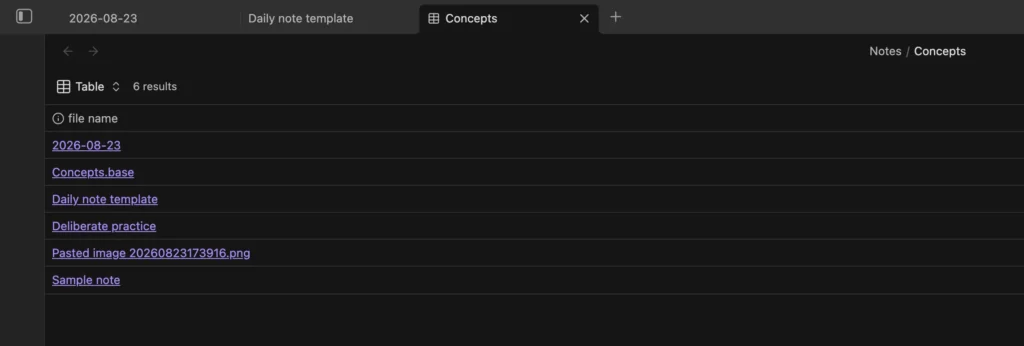
Immediately after you create the Base, it displays all files in your vault by default. The next step is to filter the results.
A Base filter contains three parts: a property, an operator, and a value.
Filter the Base by property
- In the Base toolbar, select Filter.
- Under All views, add a new filter.
- For Property, select
type. - Select the comparison operator for an exact match (‘is’).
- For Value, choose the option
concept.
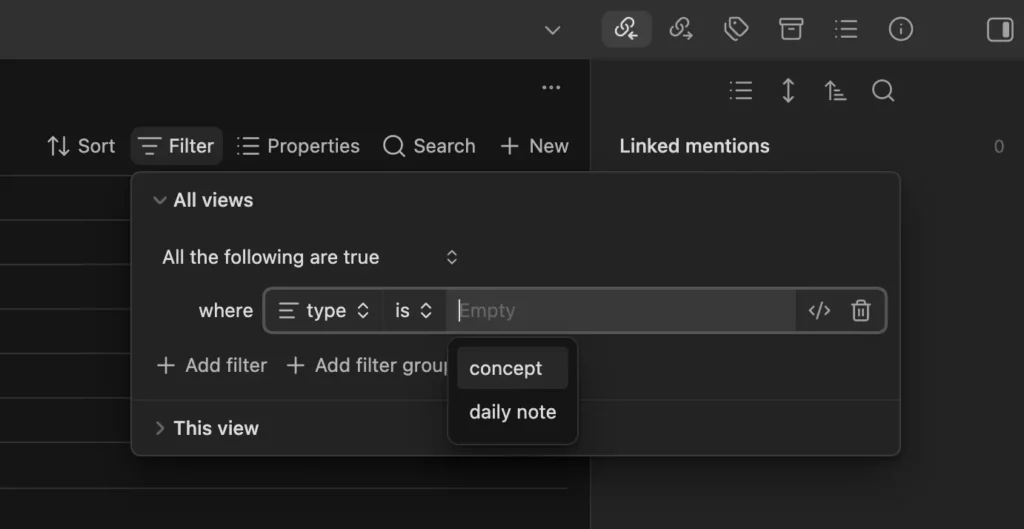
The Base now displays only notes whose type property is set to concept.
For example, a note containing:
---
type: concept
status: developing
---
appears in the Base, while a note containing:
---
type: daily note
---
does not.
Choose which properties to display
- In the Base toolbar, select Properties.
- Enable
type. - Enable
status. - Remove any properties that are not useful for this view.
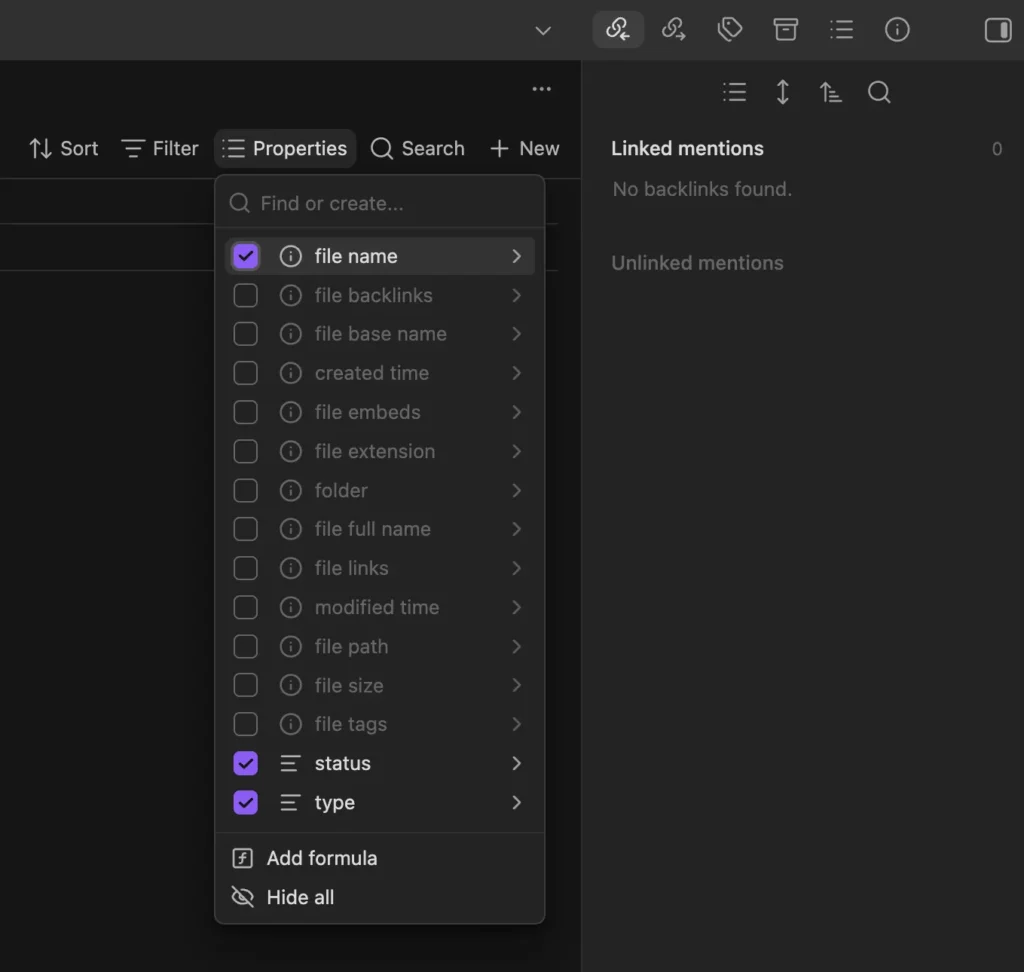
The table now shows the matching notes together with the selected properties.
12. Verify the setup
The basic setup is now complete.
You should be able to complete each of the following tasks:
- Create a regular note and have it appear in
Notes. - Open today’s daily note and have it appear in
Daily Notes. - Add an attachment and have its file appear in
Attachments. - Create a
[[wikilink]]from one note to another. - View backlinks to a linked note.
- Find a note by name with Quick switcher.
- Find notes and their content with Search.
- Use the daily-note template for newly created daily notes.
- Use Bases to display notes that share the same property value.
Next steps
This setup is capable enough for anyone starting with Obsidian to manage their digital knowledge effectively.
The immediate next step is to become familiar with this simple system: create notes, link them, and observe how you capture and retrieve information. Make small changes to the vault as your workflow demands them.
Over time, as the number of notes grows, you may need additional functionality.
Here are some common problems you may encounter and the corresponding solutions available in Obsidian:
| If you repeatedly encounter this problem… | Consider adding… |
|---|---|
| You are managing multiple projects across your personal and professional life. | A project-based folder structure such as PARA. |
| You create the same kinds of notes repeatedly and need more flexibility than the core Templates plugin provides. | More templates or the Templater community plugin. |
| Repeatedly creating, naming, templating, and moving notes adds unnecessary friction. | The QuickAdd community plugin. |
| You need to record structured information such as status, type, author, or date. | Properties. |
| You want to view similar types of notes as a group. | Bases, or Dataview for more flexibility. |
| A topic or subject spans many notes, areas, types, and categories. | A map of content (MOC). |
| You need a classification system that cuts across folders and links, especially for inline content. | Tags and nested tags. |
| A long-term project becomes difficult to manage because its notes are scattered across the vault. | The Longform community plugin. |
| Capturing material from the web, such as books, articles, or other resources, takes too much manual work. | Obsidian Web Clipper. |